This extensive (but very straightforward) help file will teach you how to setup and use SmartScreen WordPress theme. Using this theme is really easy so if you’re an experienced user of WordPress, you probably don’t need to read entire the help. Just explore the options panel and start using the theme!
Our themes usually get regular updates including bug fixes and improvements. So don’t forget to follow us on twitter and envato.

Some Important Notes
- Please take the time to read through the documentation, as many support related questions can be answered simply by re-reading these instructions.
- We will be happy to help you tweak the theme but just for small ones. For more advanced customization, contact us for paid customization.
- If you have any support questions, please use the “Item Discussion” section. If you want to remain anonymous, use our profile page to send email. So we can confirm you’ve purchased this theme.
- Again, Thanks for purchasing our themes. Please don’t forget to give us some stars if you enjoyed using our themes.
OK, it’s installation time! After extracting the .zip file you’ve downloaded from themeforest, there will be a folder named “smartscreen“. You need to upload it into “wp-content->themes” of your installed WordPress. Then you can activate the SmartScreen theme as you would activate any other theme at Appearance -> Themes.
Note: if you prefer using wordpress theme installer, you should still extract the zip file, after that, you will find smartscreen.zip file inside it.

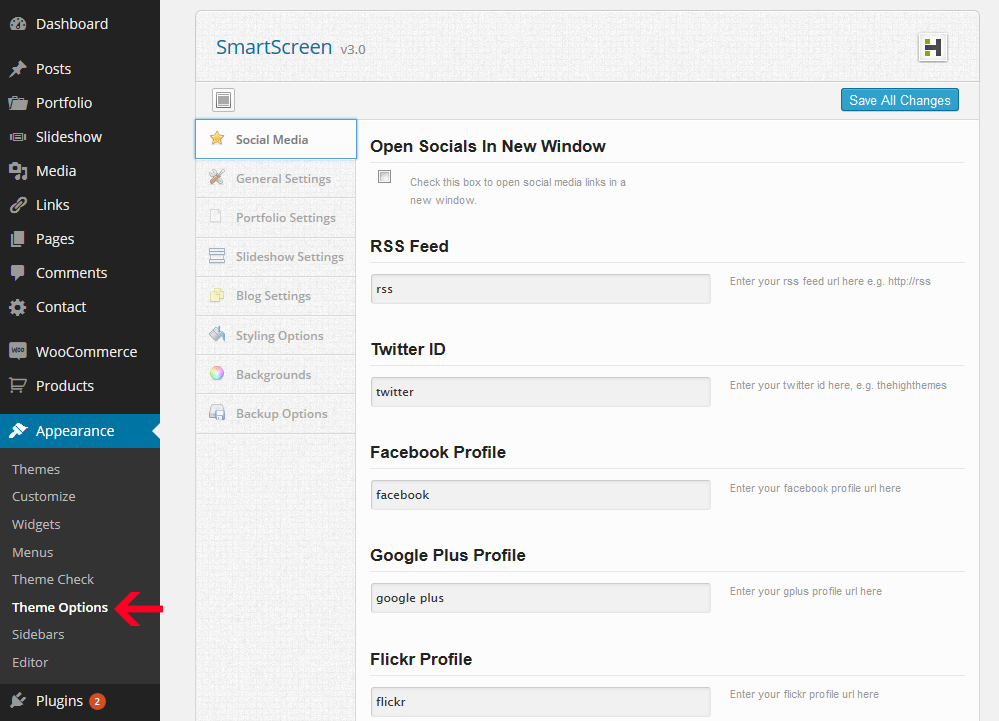
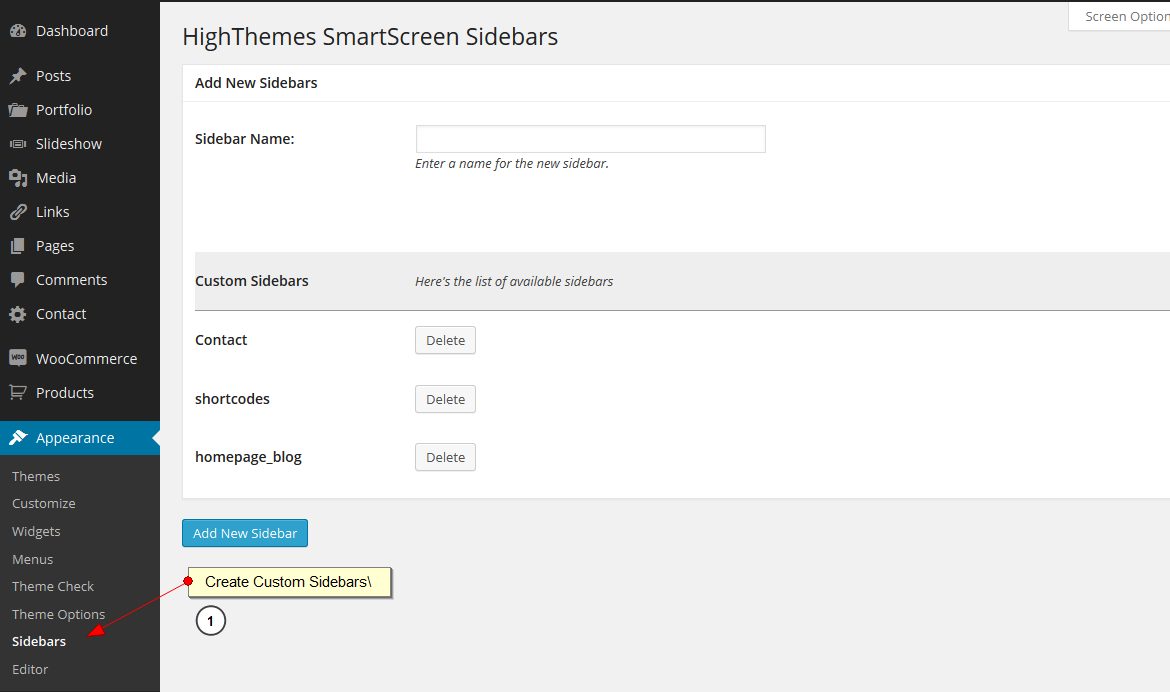
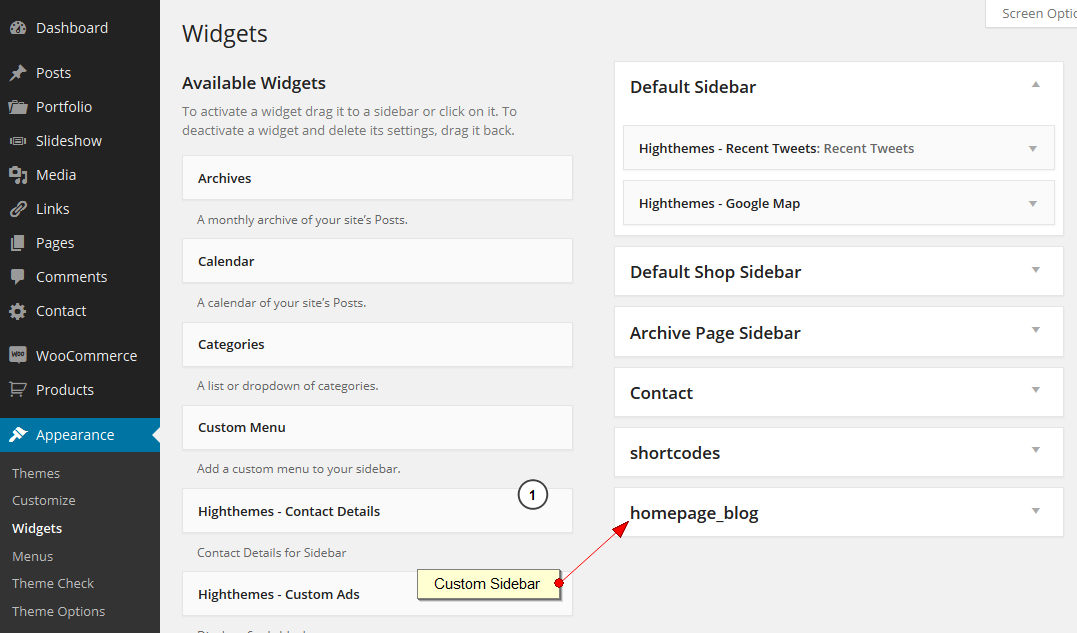
After activation, you can find “Theme Options” panel on the WordPress admin sidebar under Appearance. As you see, there are 3 other new sections added to the WordPress sidebar. Slideshow, Sidebars, and Portfolio. We will cover all in this document.

It’s so easy to create your homepage via SmartScreen.
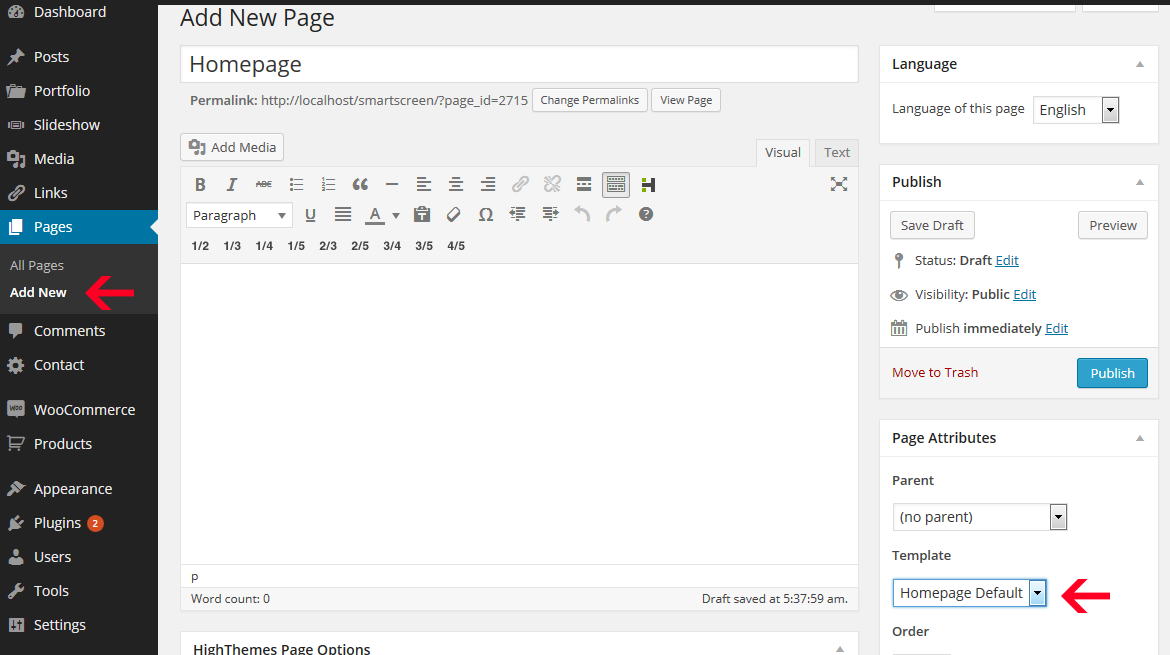
1. Create a Page and call it homepage (for example)
Go to Pages->Add New . As you see in the image below, on the right sidebar there is a content box titled “Page Attributes”. Choose “Homepage Default” from the list and publish the page.
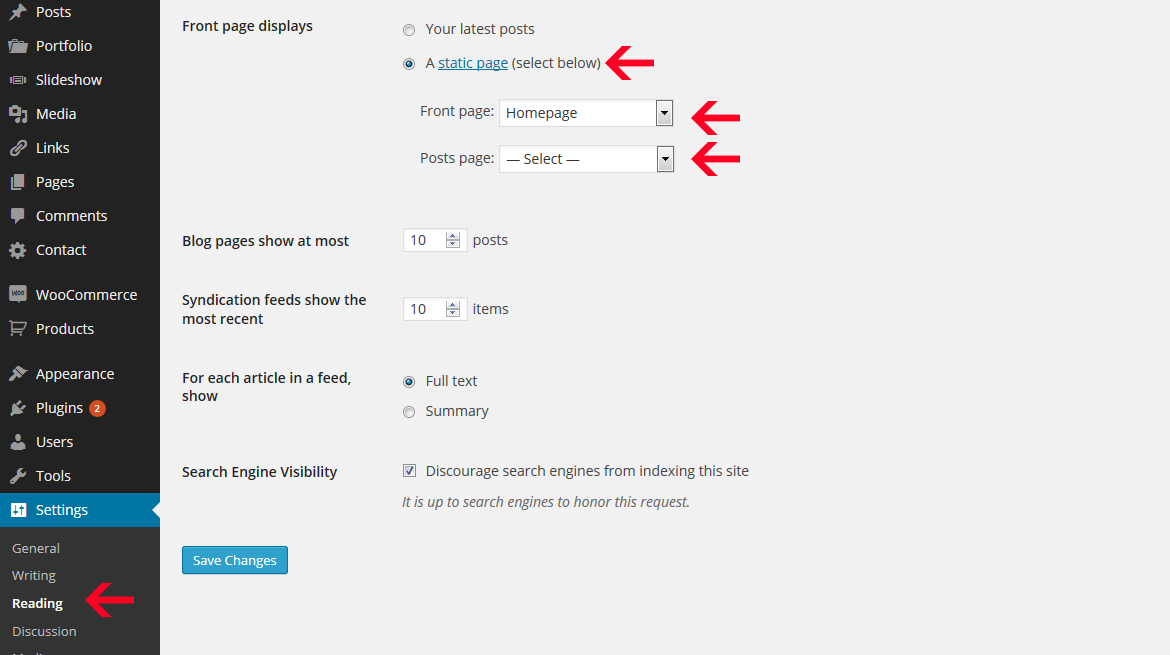
Now go to Setting->Reading, choose A static page and select Homepage (which you created in previous step) and save changes.
2. Now you need to create your slideshow
Since SmartScreen is an full screen theme. It’s main feature is ability to have slideshow with big images. So you need to create the slideshow items to have your homepage ready to go. Read the next section please!
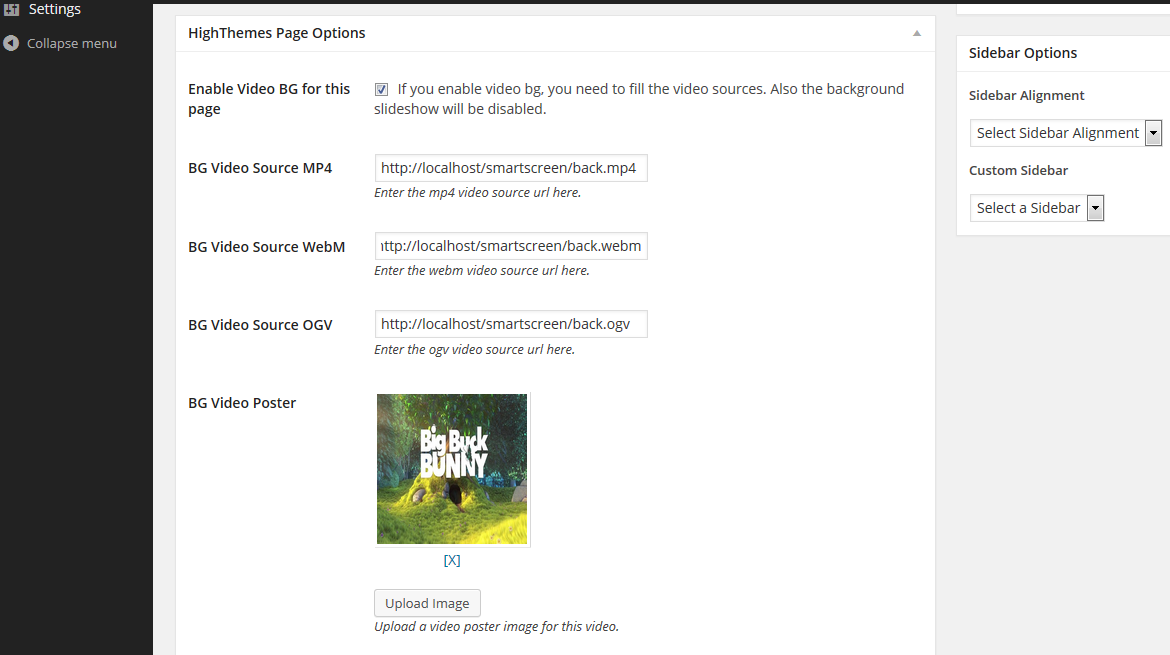
3. Add Video Background to Homepage
From version 3, you can add video background to any page you like including homepage. If you enable video background for a page, the background slideshow won’t show anymore.
When you go to WordPress admin dashboard, at the sidebar there’s a new section called “Slideshow”. click on it. You can create slider’s items easily like creating new posts.
How the Slider Works
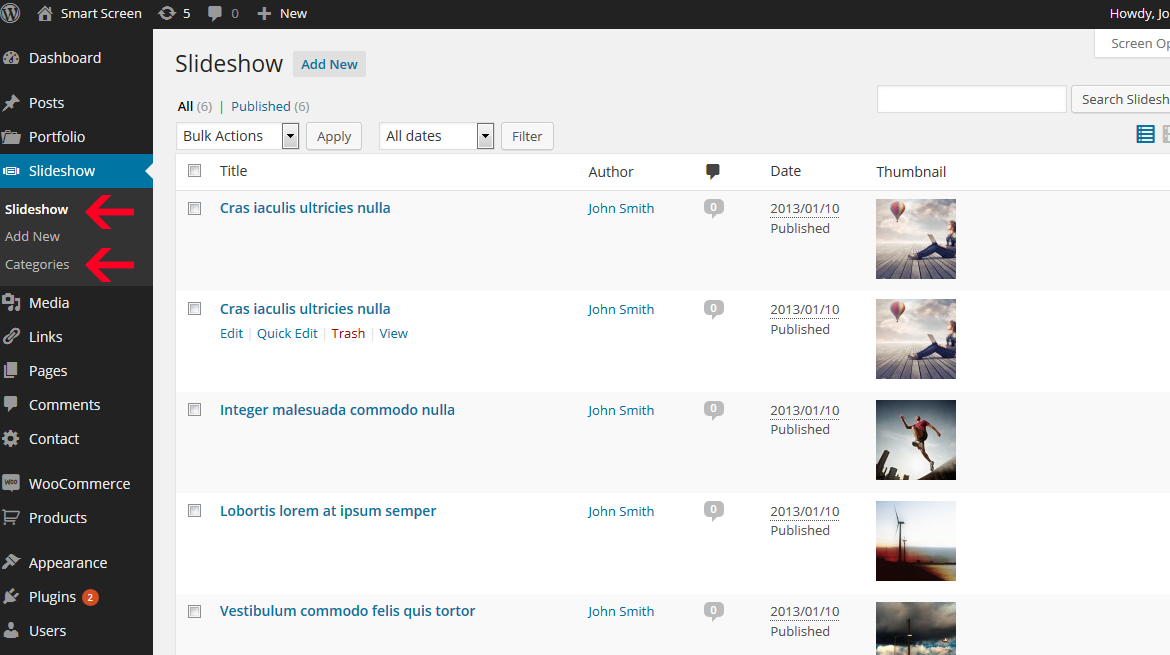
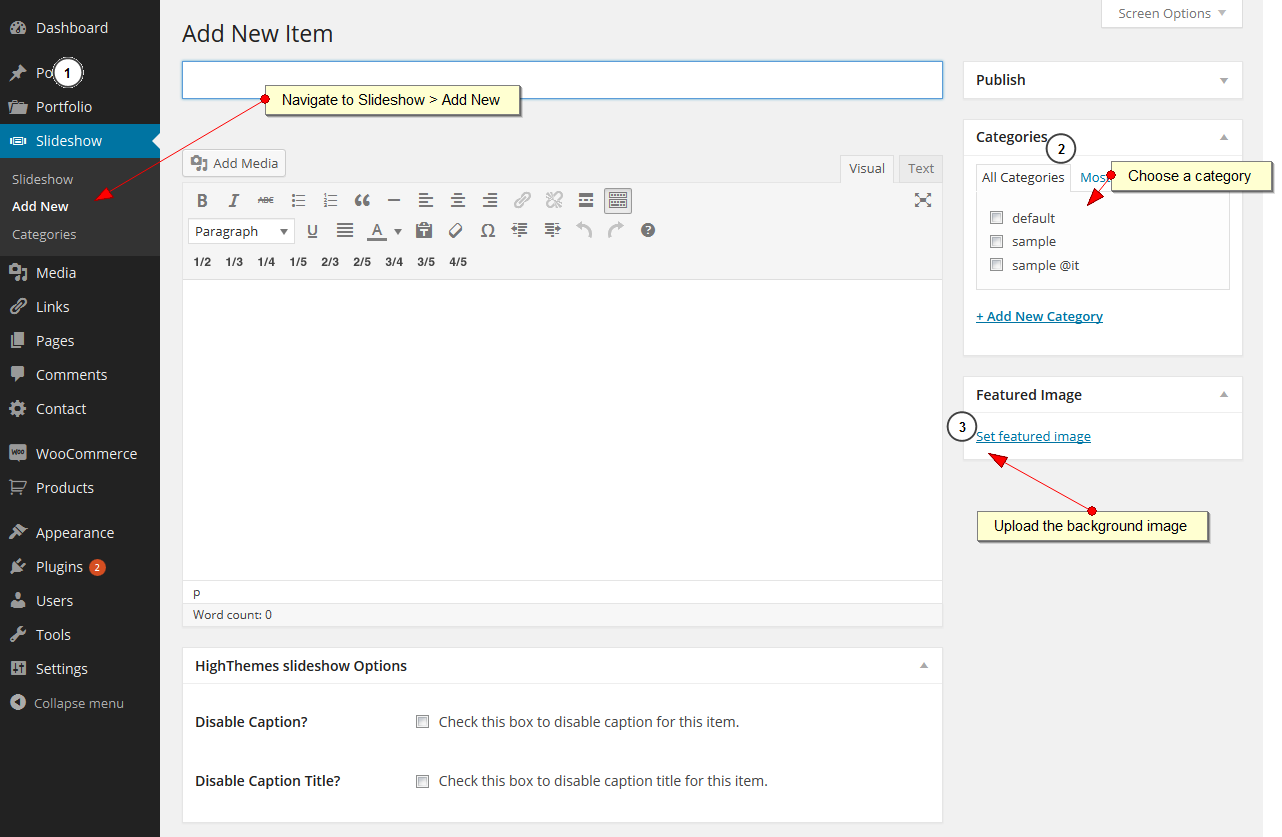
You can click on Slideshow->Add New section and create as many item as you like. As you see in the image below, there is another link named “Categories”. We use this to create groups of items and categorize the slideshow items. For example maybe you would like to have 3 images for homepage, 2 different images for about page, 5 different images for portfolio, and etc. In this situation “categories” will be handy. You specify a category for each slideshow items and when you create pages, you will have an option to assign that category to the page. Please check the images below
Create an item
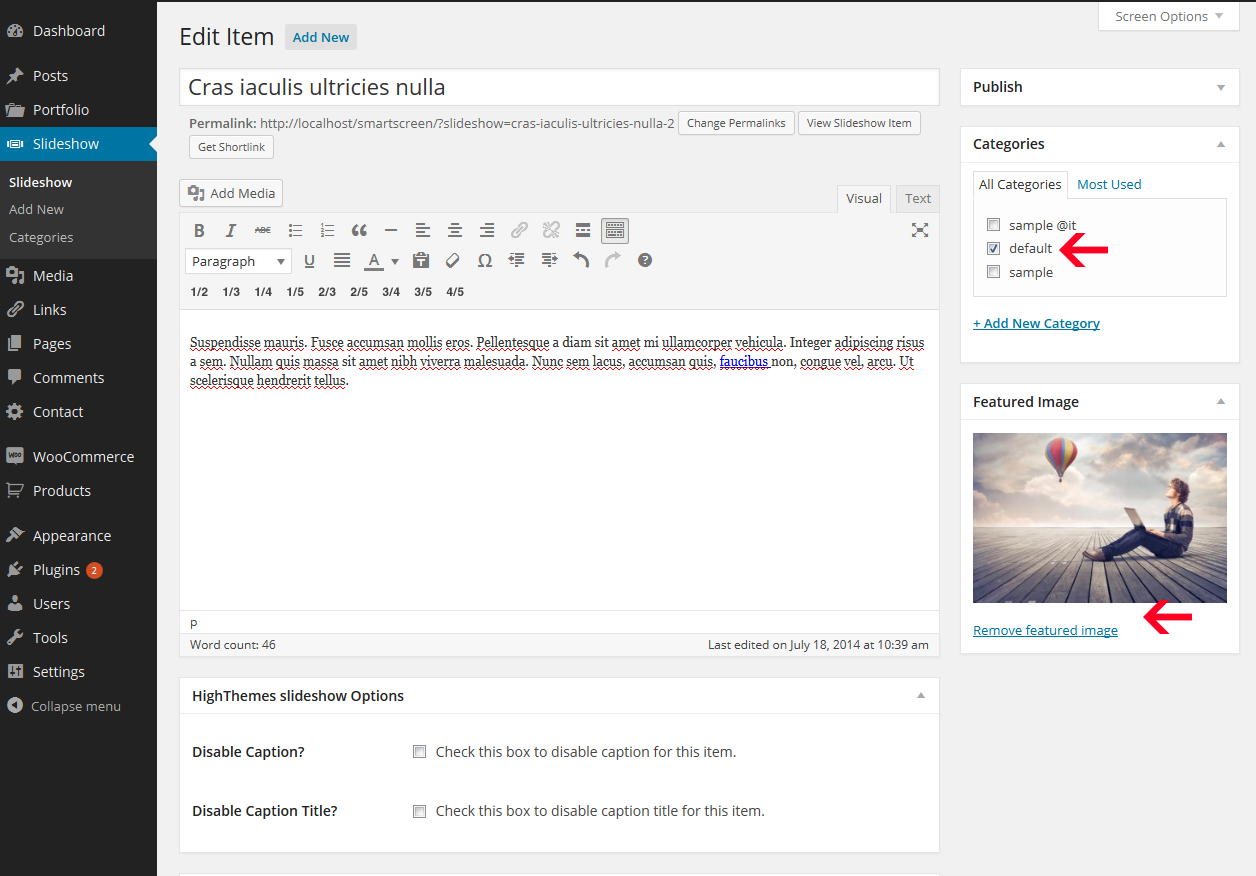
When you click on “Add New” the page below will be displayed. As you see in the image below, you can specify a category for the item. Make sure your images are large enough to have better quality on bigger screens.
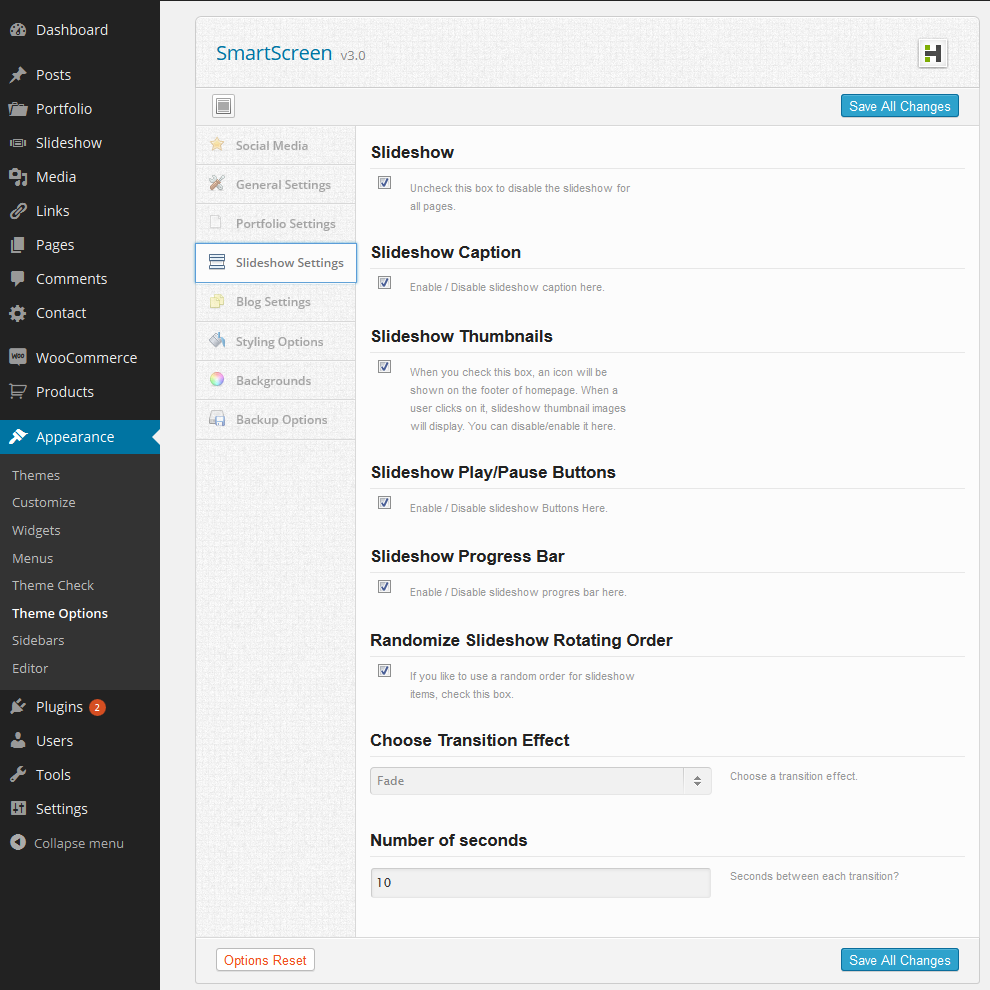
- There are some additional options for the entire slideshow which can be find in admin options -> slideshow
You can disable/enable slideshow for all pages, choose transition effect, transition speed , and …
How to add images to slider
When you click on Slideshow->Add new, at the right sidebar, there will be a link called “Set featured image”. Click it and upload your image. Once uploaded, click on “Use as featured image” link at the bottom of opening page.
How to show a slideshow category on a particular page/post/portfolio page
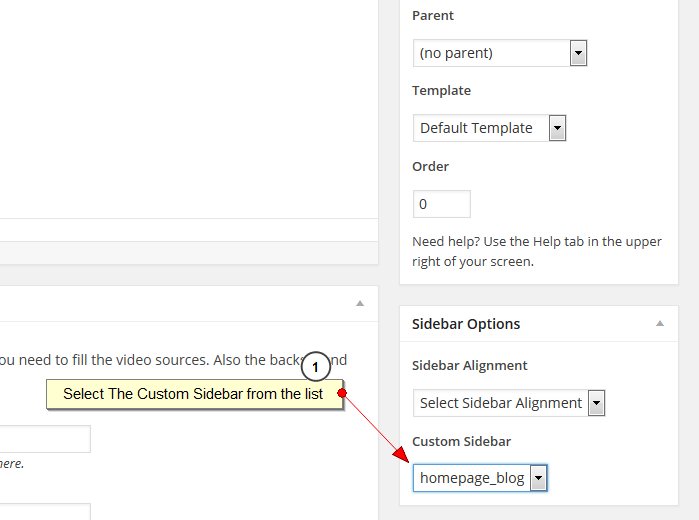
After grouping your slider items with the categories section of slideshow page, you will be able to use those categorized items for each page/post/portfolio. Say we want a slideshow with 3 items A,B,C for homepage and show all items for all pages (A, B, C, D, E, F). So we create to a category (e.g. slideshow1) and assign A, B, C to it. Now assign it to homepage like the image below:

Note: if you select “All Items”, the page will show all slideshow items without looking at their categories. Also, you can disable the slideshow for this or any page with “Slideshow Status” select box shown in the image above.
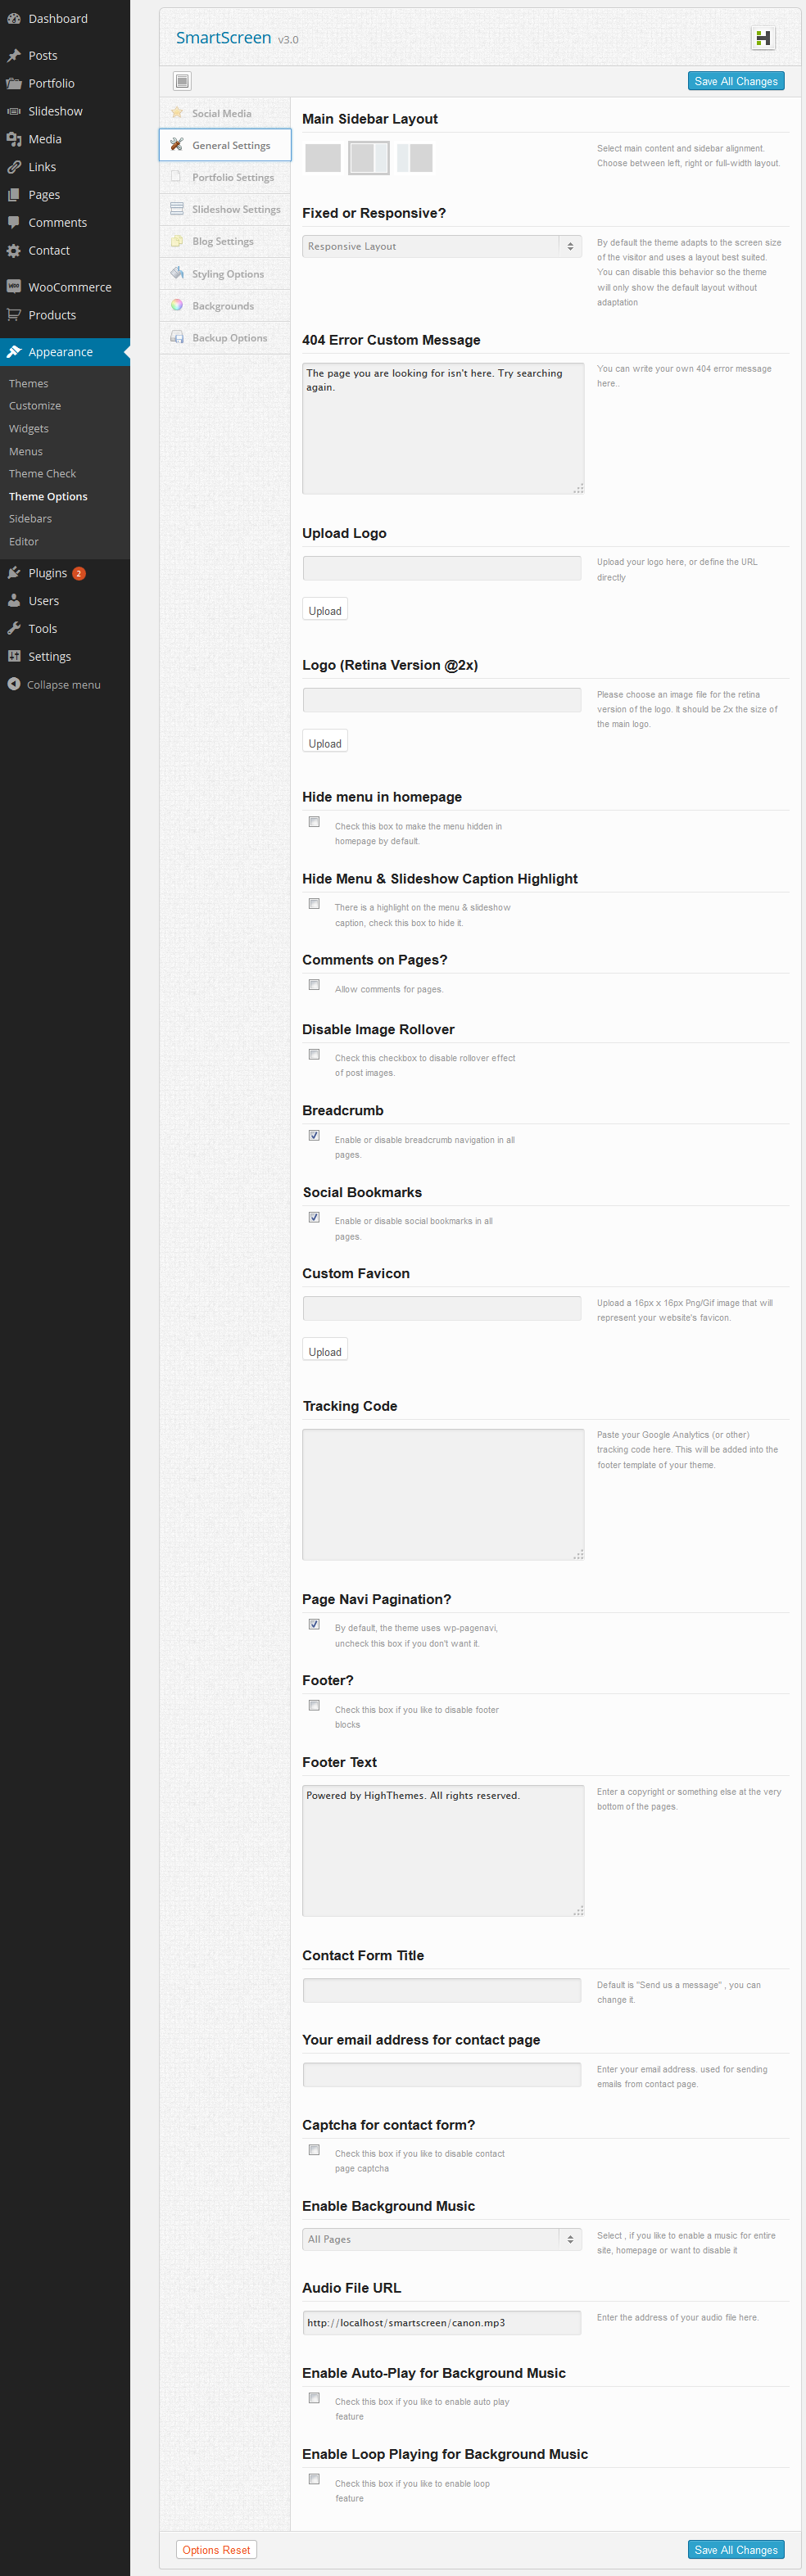
In this section we will take a look at the general settings of the theme. There is no need to explain each section because each sections comes with description. One of important sections is Main sidebar layout which is explained below.
- Main Sidebar Layout: Here you can change the overall sidebar alignment for pages. for example you like to have left sidebar for all pages so you can choose it now. If you want to exclude a page or post from this layout, you can override it when you create a page/post on “Sidebar Options” which will be explained later.
SmartScreen comes with two blog types. Main blog and sub-blogs (unlimited blog). In the main blog all categories will include except those you exclude using the admin panel. But sub-blogs can only inlcude those categories you select. To setup your main blog, fallow the steps below.
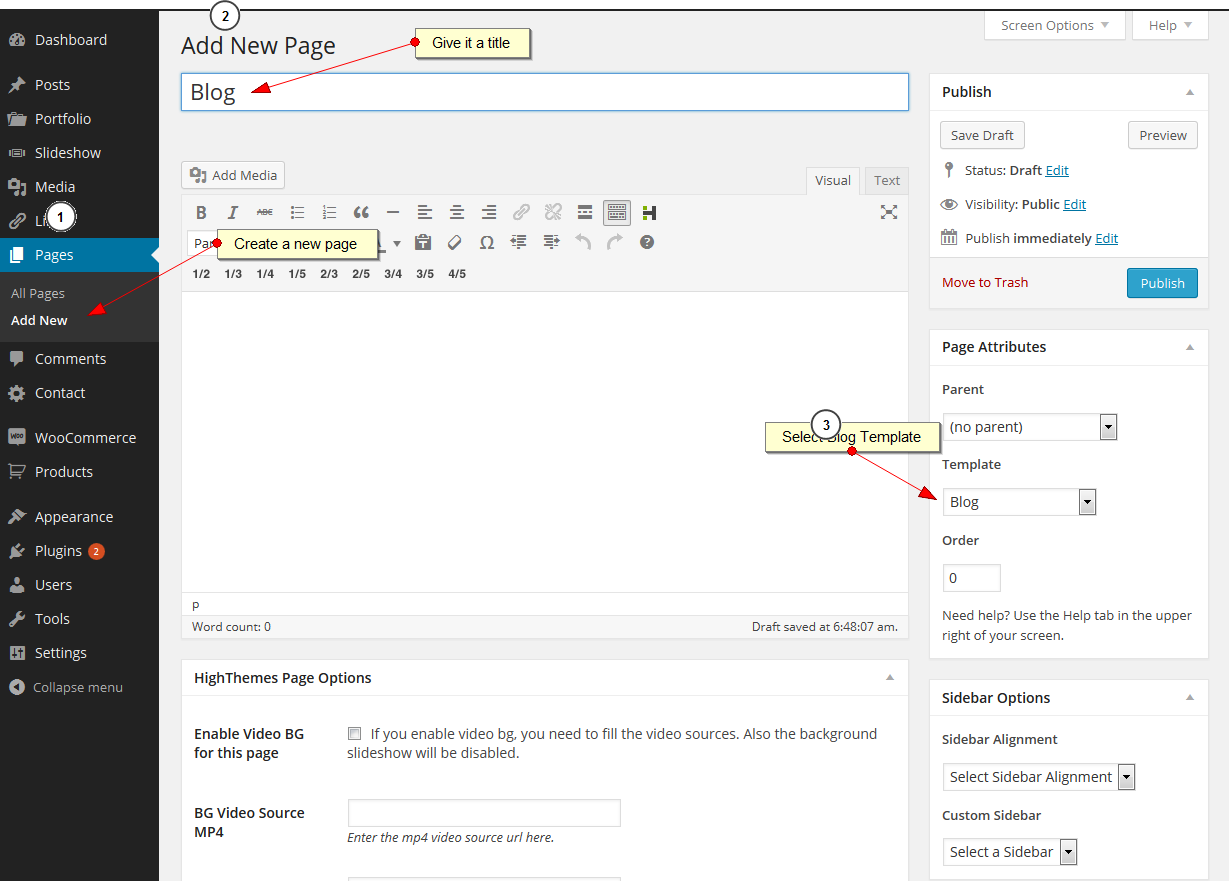
- Create a blank page and call it for example blog
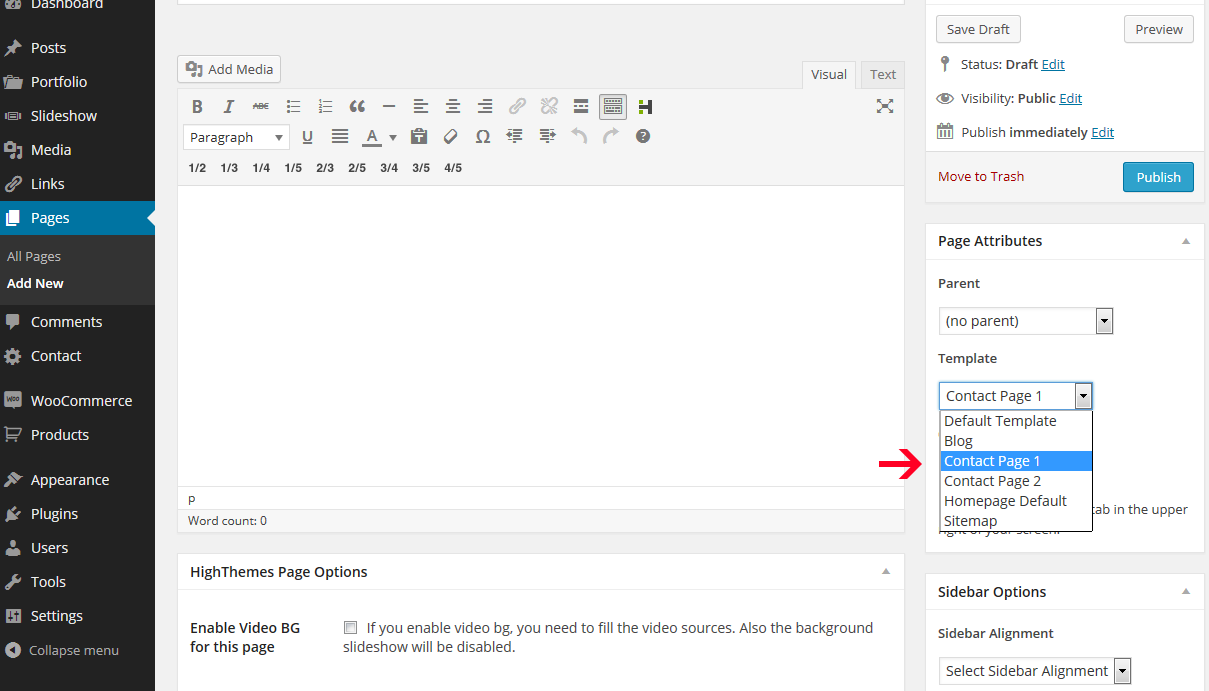
- As the image below, select “Blog” from Template list.
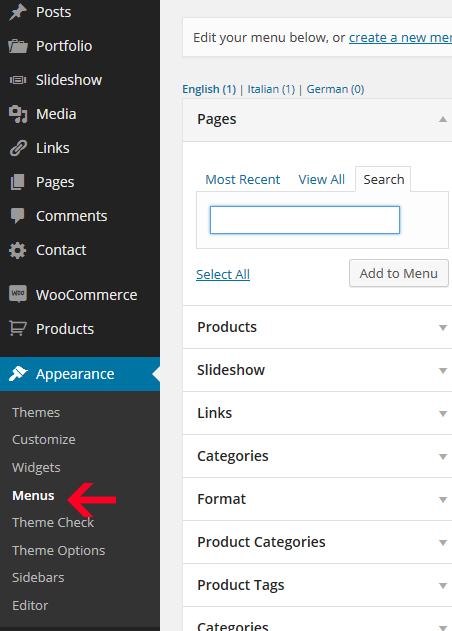
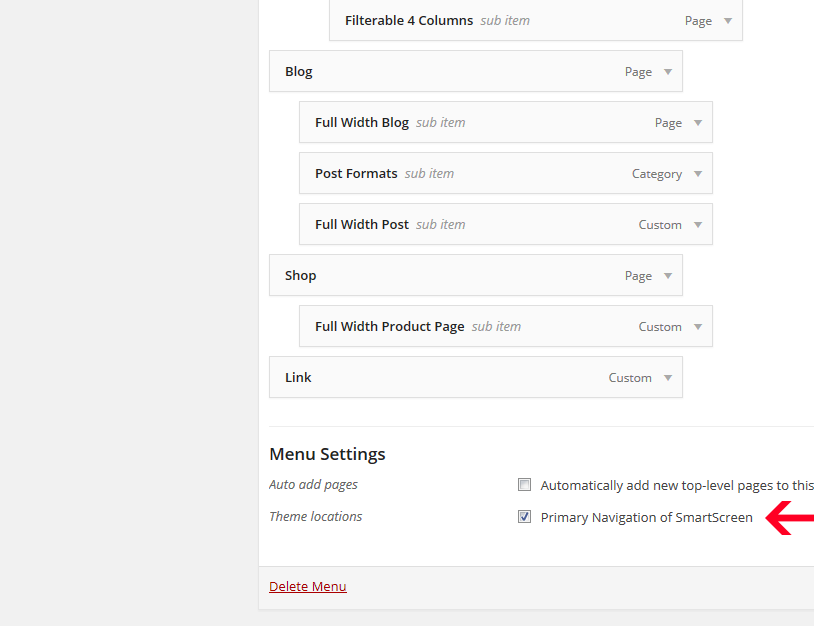
- Add it to main navigation (go to Appearance -> Menus ).
2. Blog Options
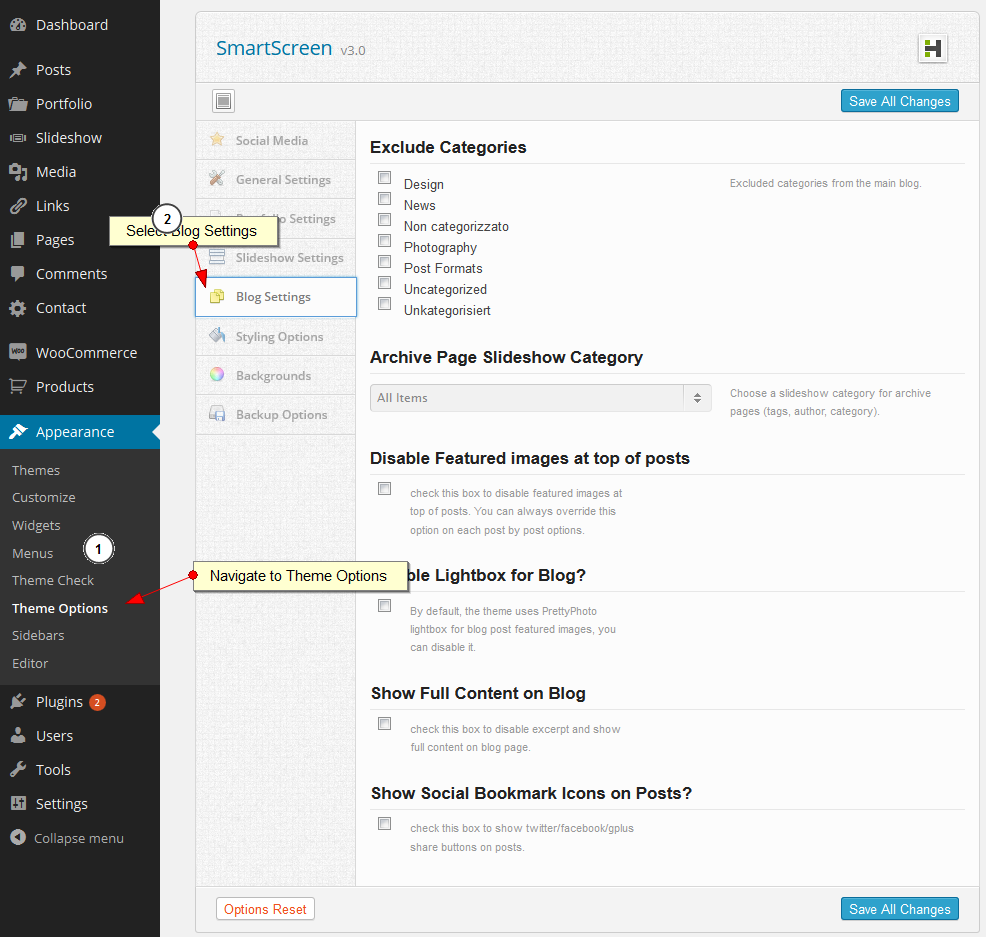
as you see in the image above, you can exclude categories from the main bloge, set a height for featured image, and disable featured images
3. Creating Unlimited Blogs (sub-blog)
Say you want to have a page for your recent news, articles, etc. You can create as many blogs as you need easily by following the steps below:
- Create a page and name it what you would like.
- In “add new page” page, scroll down to find a box titled “Highthemes Page Options”
- Select Sub-Blog as specified in image, set the number of posts per page and finally select the cateogries.
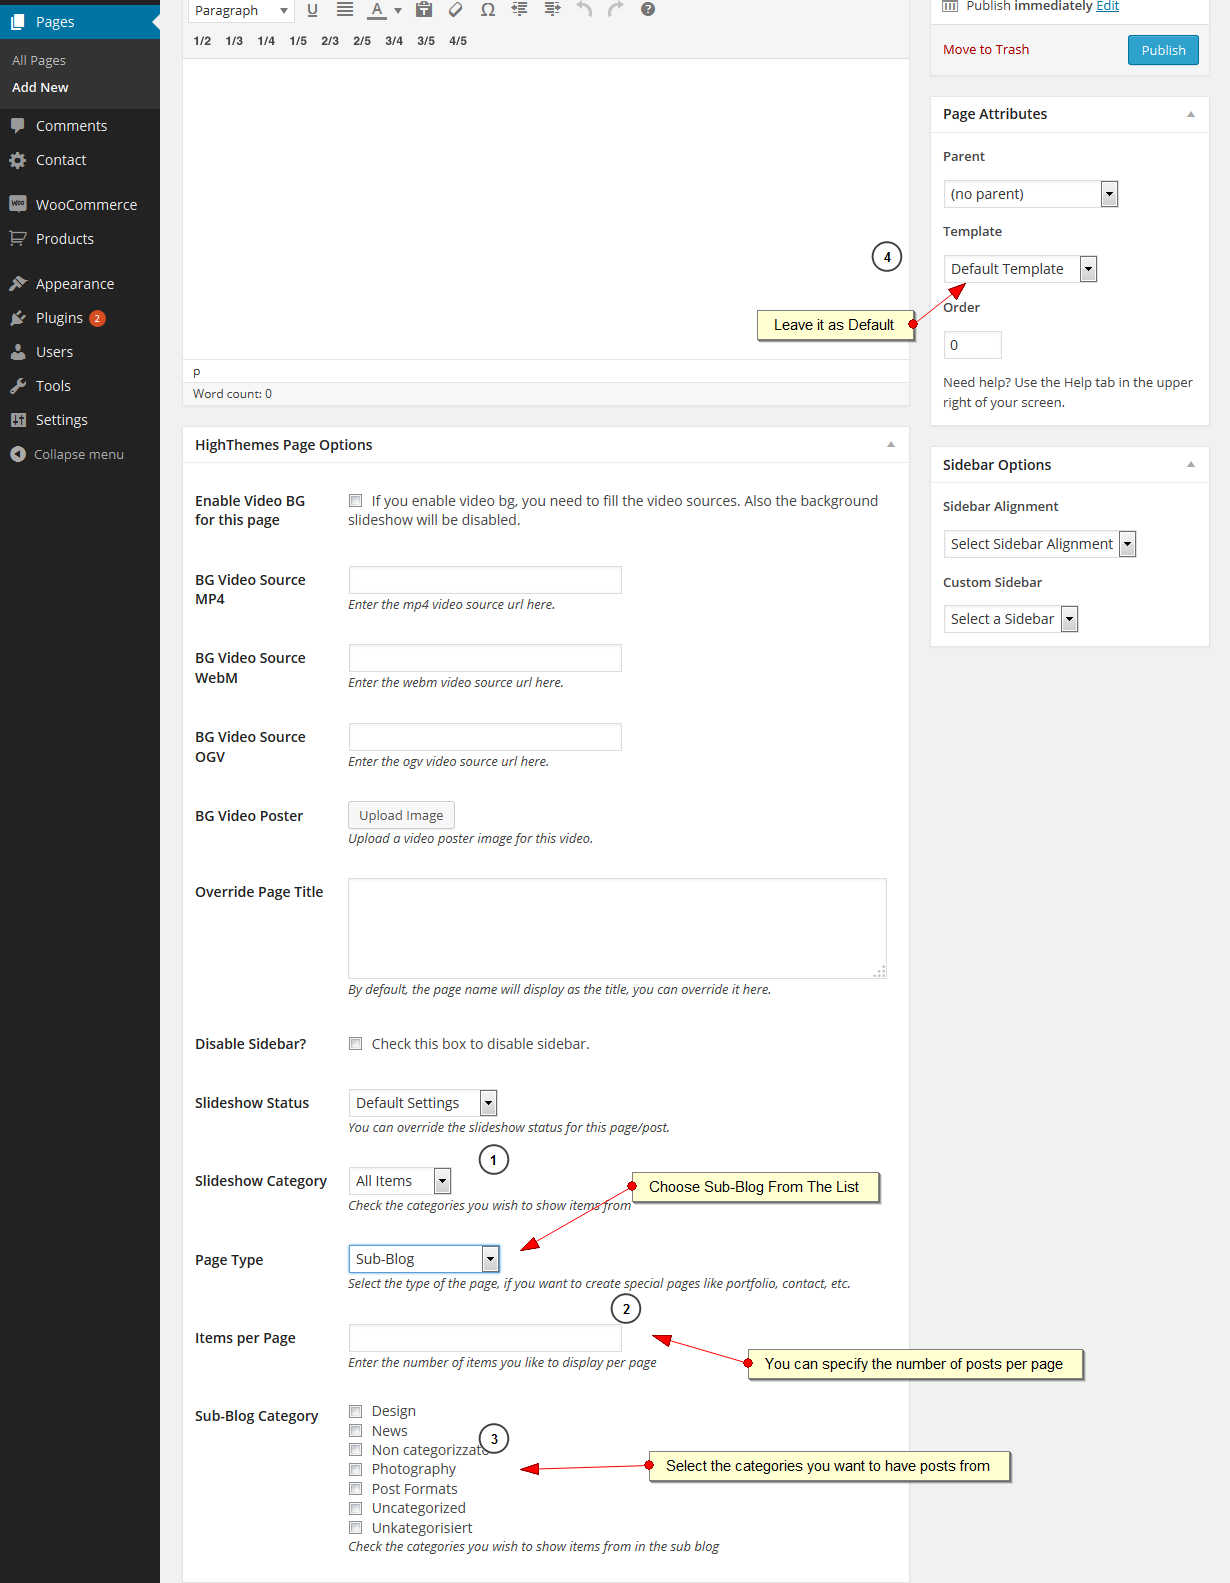
- Publish the page
- Add it to your navigation
4. Post Options
When you create a new post or edit a post, SmartScreen lets you have a few options including disabling post image, disabling sidebar, choosing and slideshow category, and adding video to post.
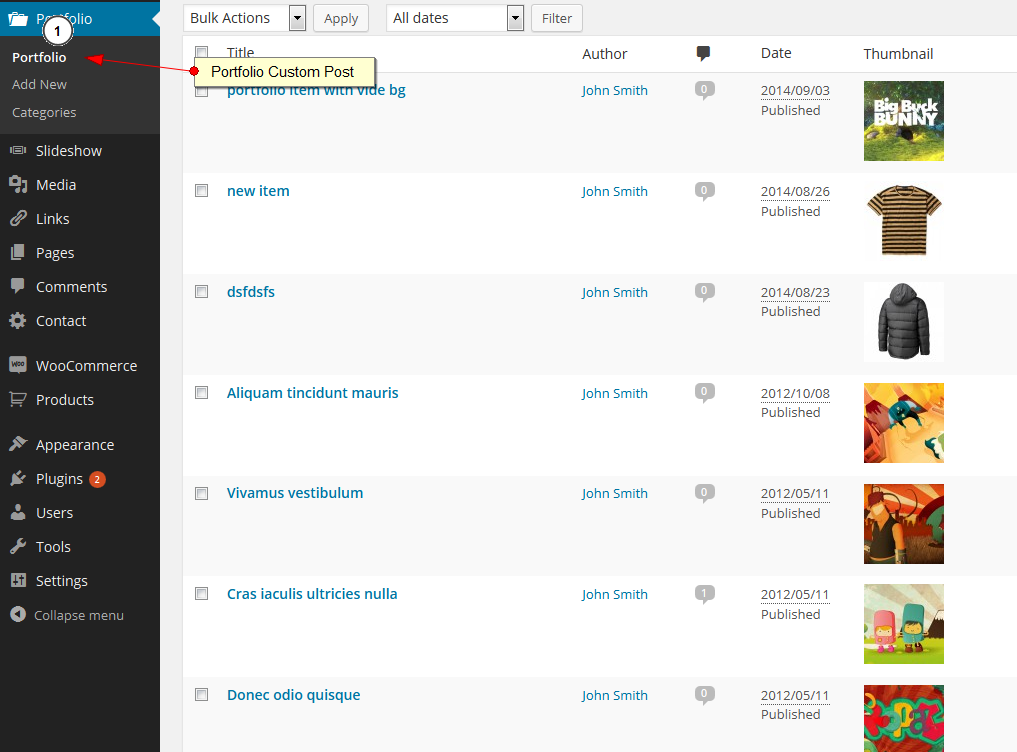
SmartScreen uses a custom post type for portfolio items. As you see there is a new section added to the dashboard sidebar.
In order to setup your portfolio page, follow the steps below.
1. Create your categories
You need to register some categories using the “categories” link on portfolio section.

2. Create the Portfolio Page
Now, navigate to Pages, click on Add New. Fill the title & Content field as you like. Then scroll down the page and find Highthemes Page Options content box.
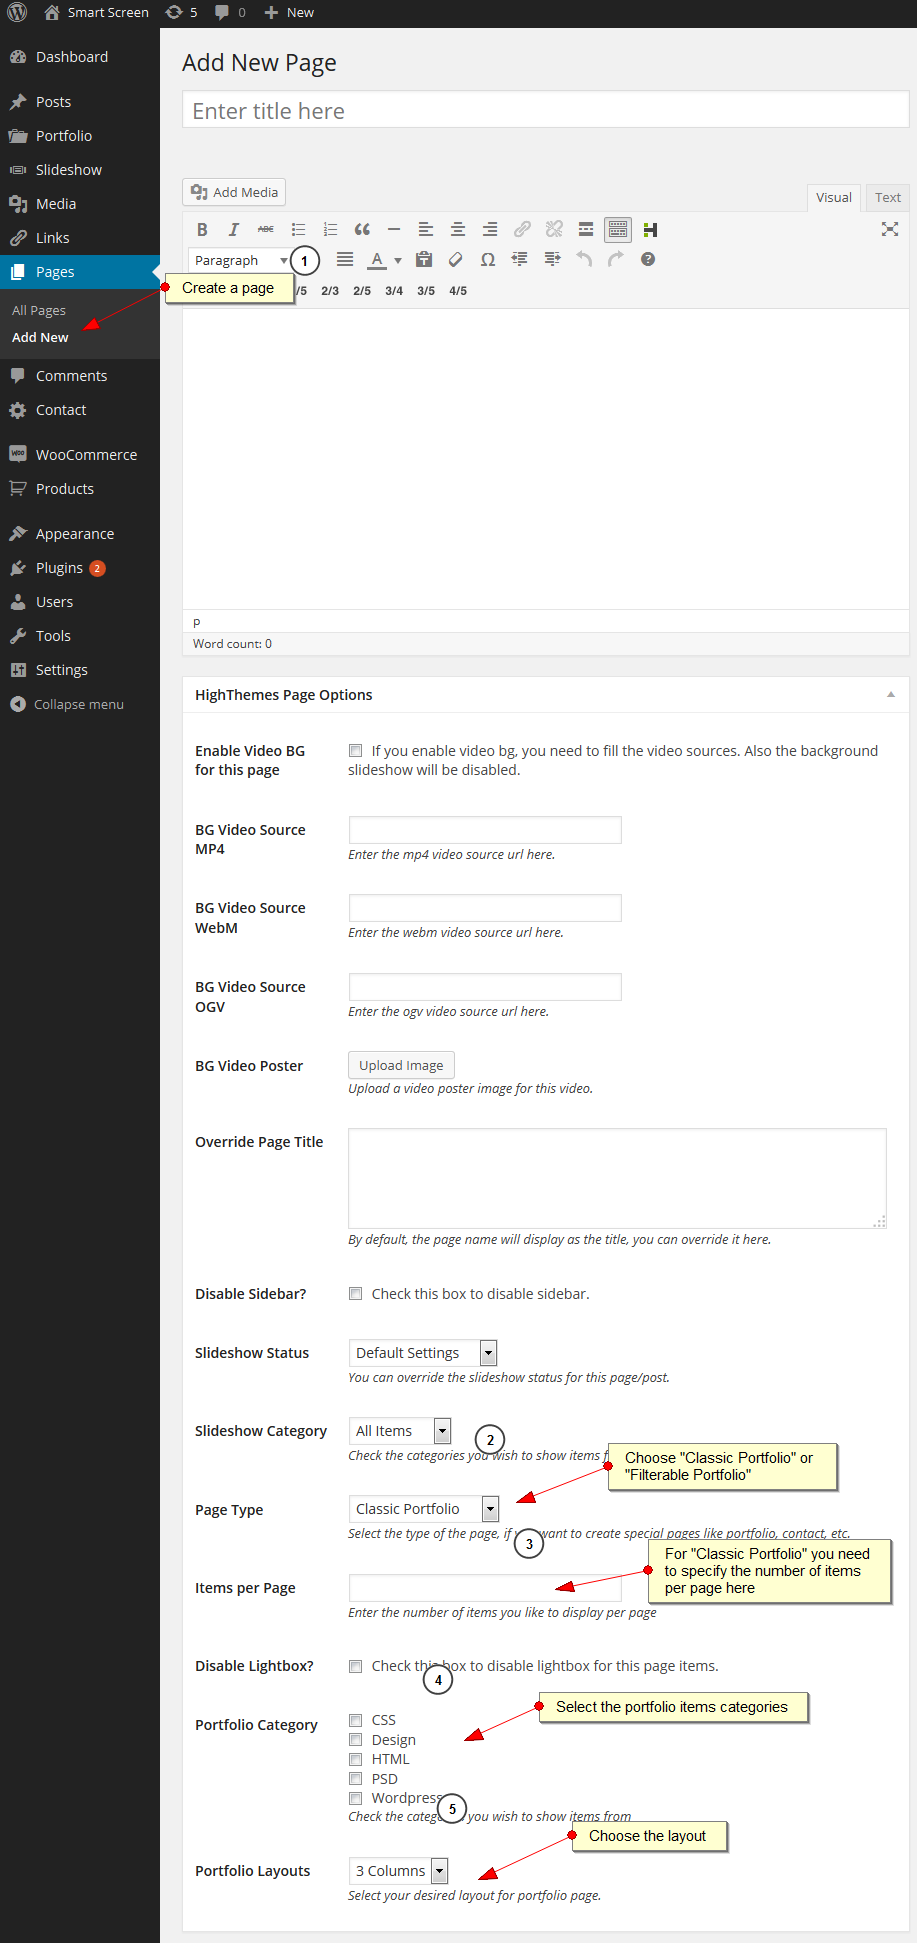
As you see, you should select Classic Portfolio or Filterable Portfolio from page type options. Also select the category (Portfolio Category) specify the number of items per page and finally select the layout . Now publish the page. In the next step we will post portfolio items.
3. Post Portfolio Items
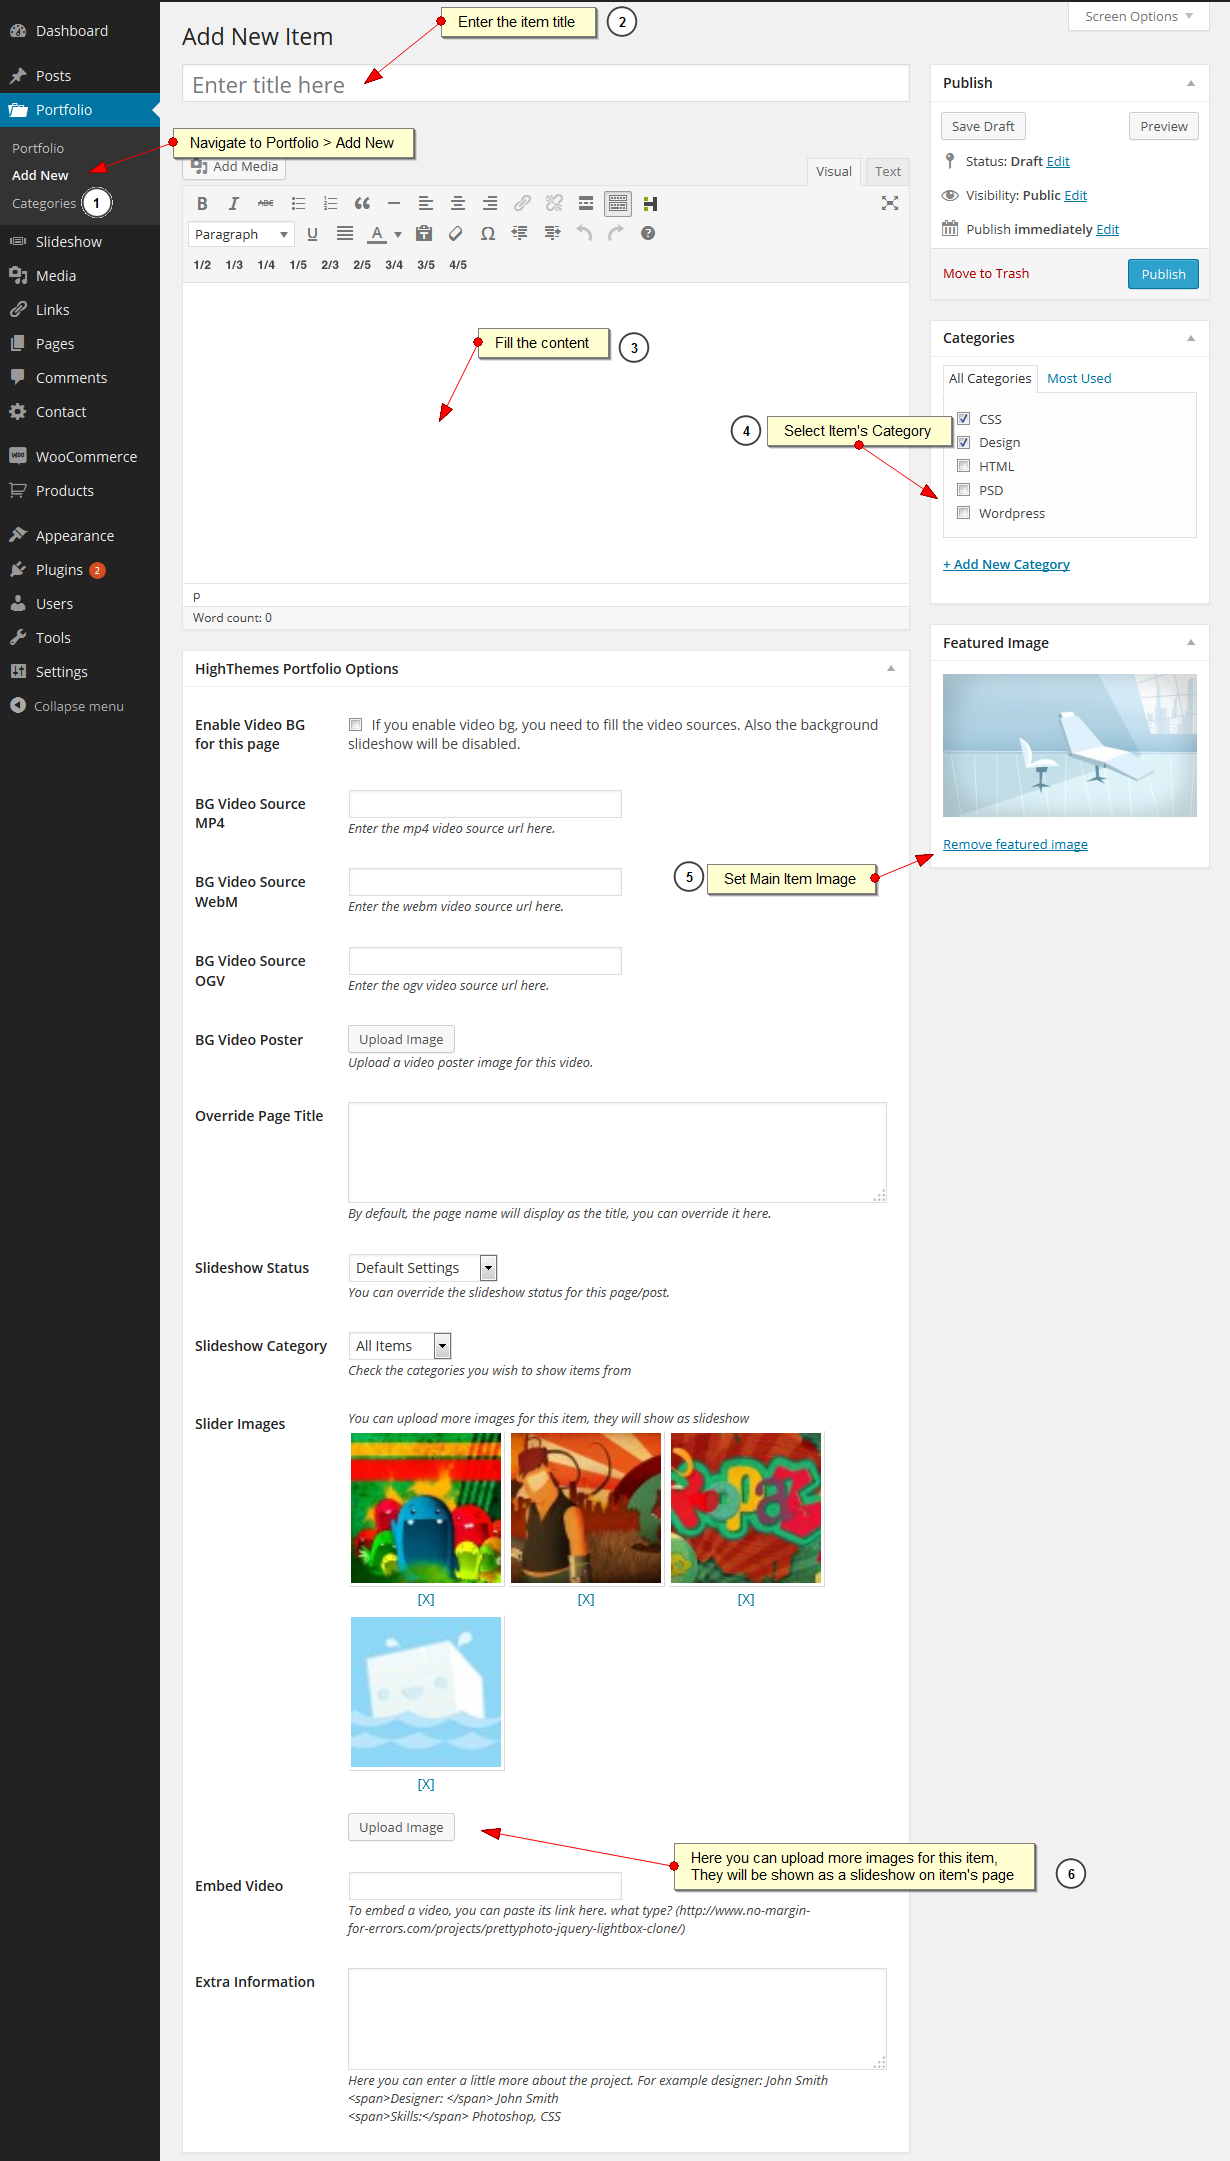
click on Add New Fill the title & content. Then specify the category of item. Now you have a few options for the item :
- You can override the title for each item
- you can set slideshow setting: enable/disable + choosing a category for specific slideshow for this item
- You can embed a video as lightbox
- you can have a video background instead of slider for each item
- Extra information: you can add more details to the item. for example : skills, designer, etc. Please fallow the description below textarea and html sample code
And finally, upload more images for the item that will use a slider if it was more than one image.
Don’t forget to posts your item under appropriate category (which you’ve specified while creating portfolio pages).
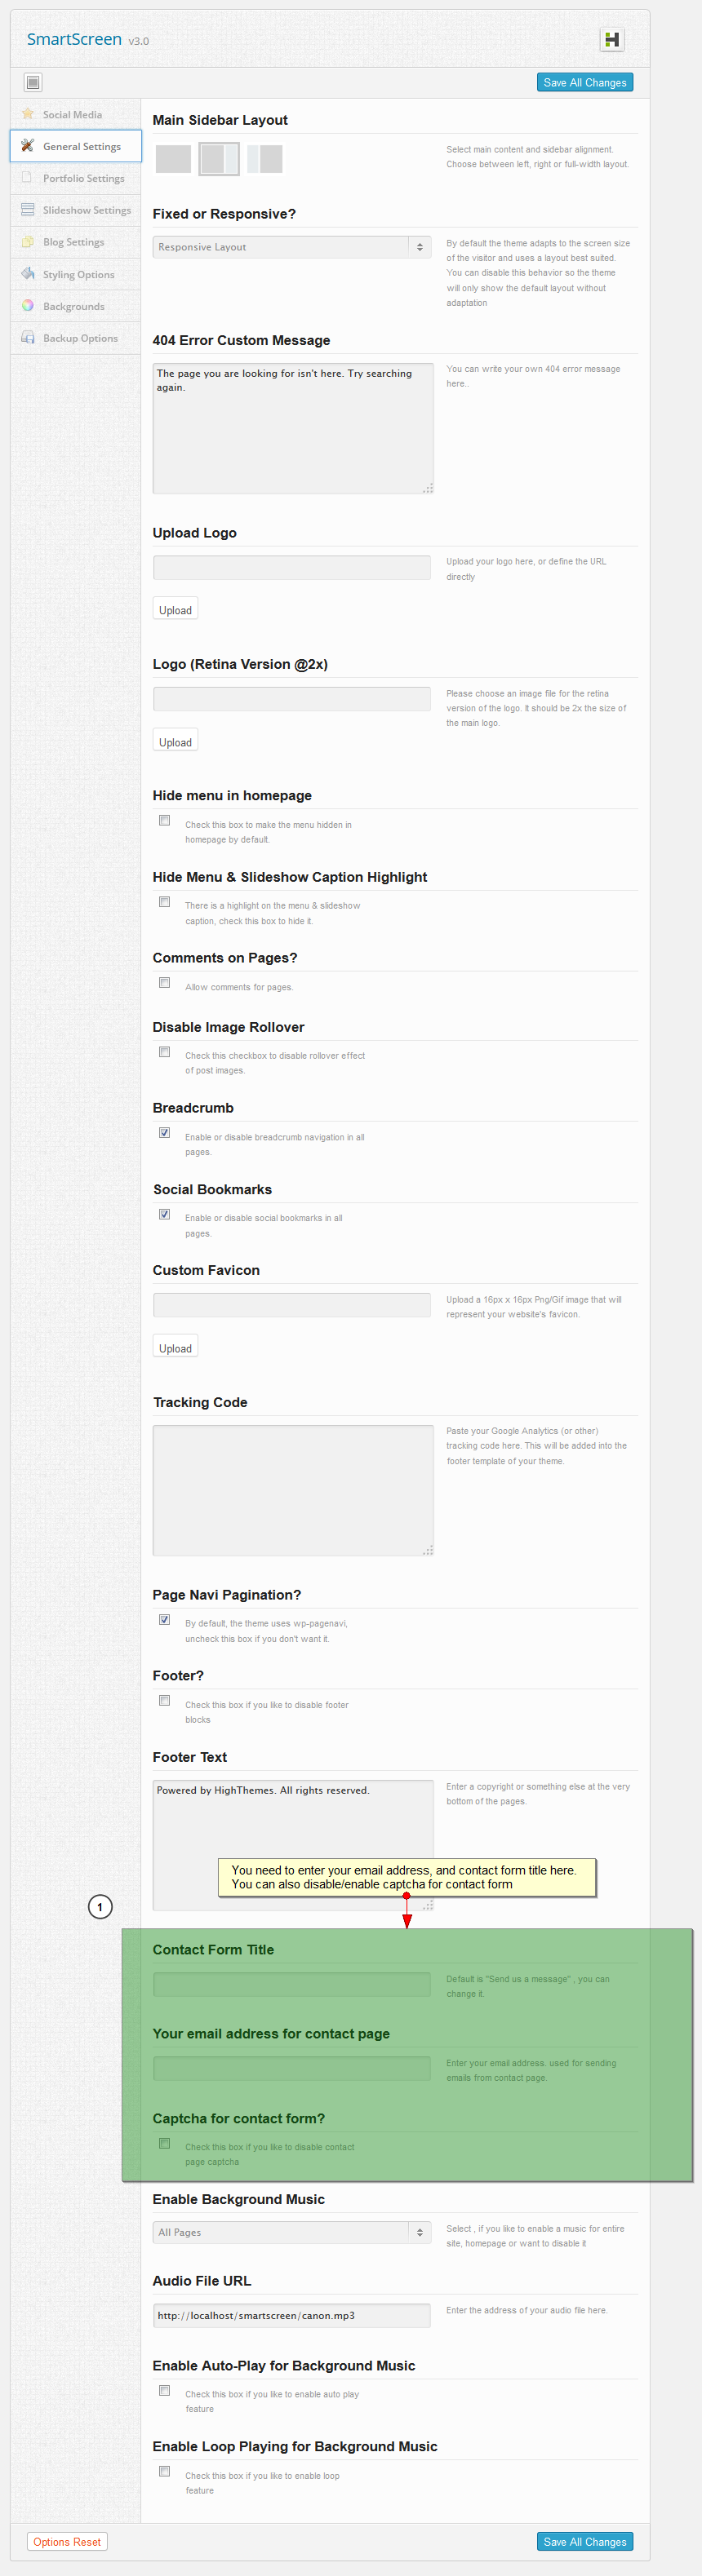
In admin options, go to general settings, at the bottom of the page. You will see a text box for entering your email address. Emails will be sent to the email address you enter here. Also you can enable/disable captcha for contact page here.
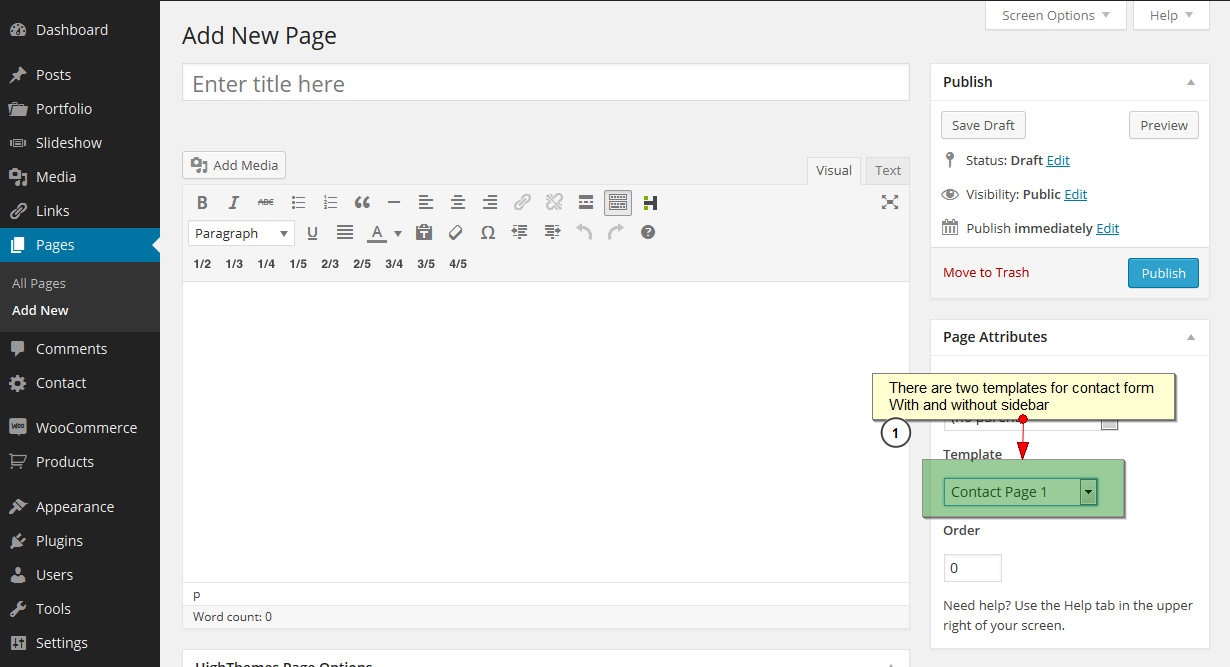
Now go to Pages -> Add New Fill the title and content area. Then choose Contact page 1 or contact page 2 from the templates list and publish the page. that’s it.
Also, you can use contact form 7 plugin. It’s compatible with SmartScreen.
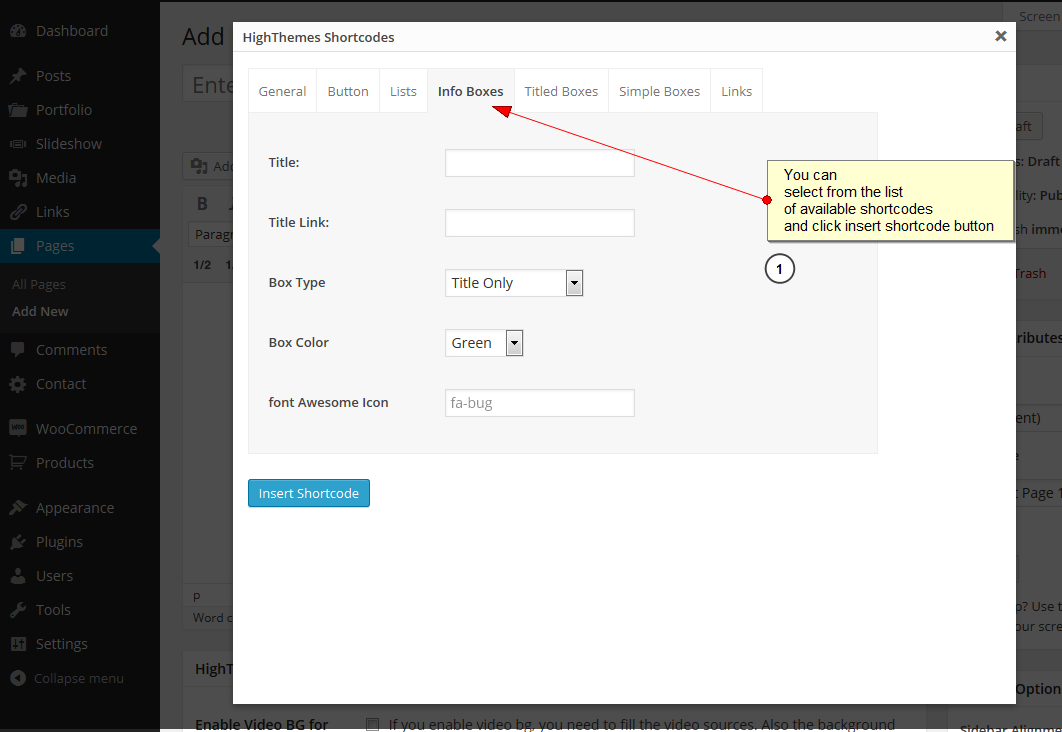
You can use style shortcodes in both pages and posts. To use, Click on the shortcodes icon in your WordPress WYSIWYG editor as shown below:
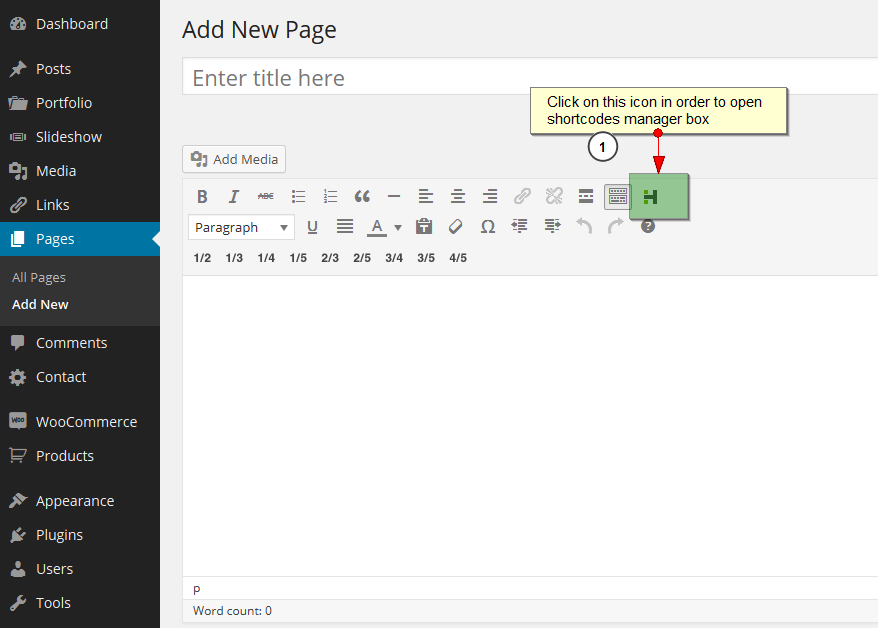
As you see, the are a couple of tabs for different shortcodes.
To have a link post format, simply choose “link” from the right sidebar, then scroll down to find Highthemes Page options, and enter your custom link.

2. Quote
In order to create a Quote post format. Select Quote format, then click on shortcode icon and insert pullquote or testimonial shortcode into the post content.
3. Video
For video, as pullquote you need to use native WordPress Video shortcode.
4. Audio
Just past the mp3 url address
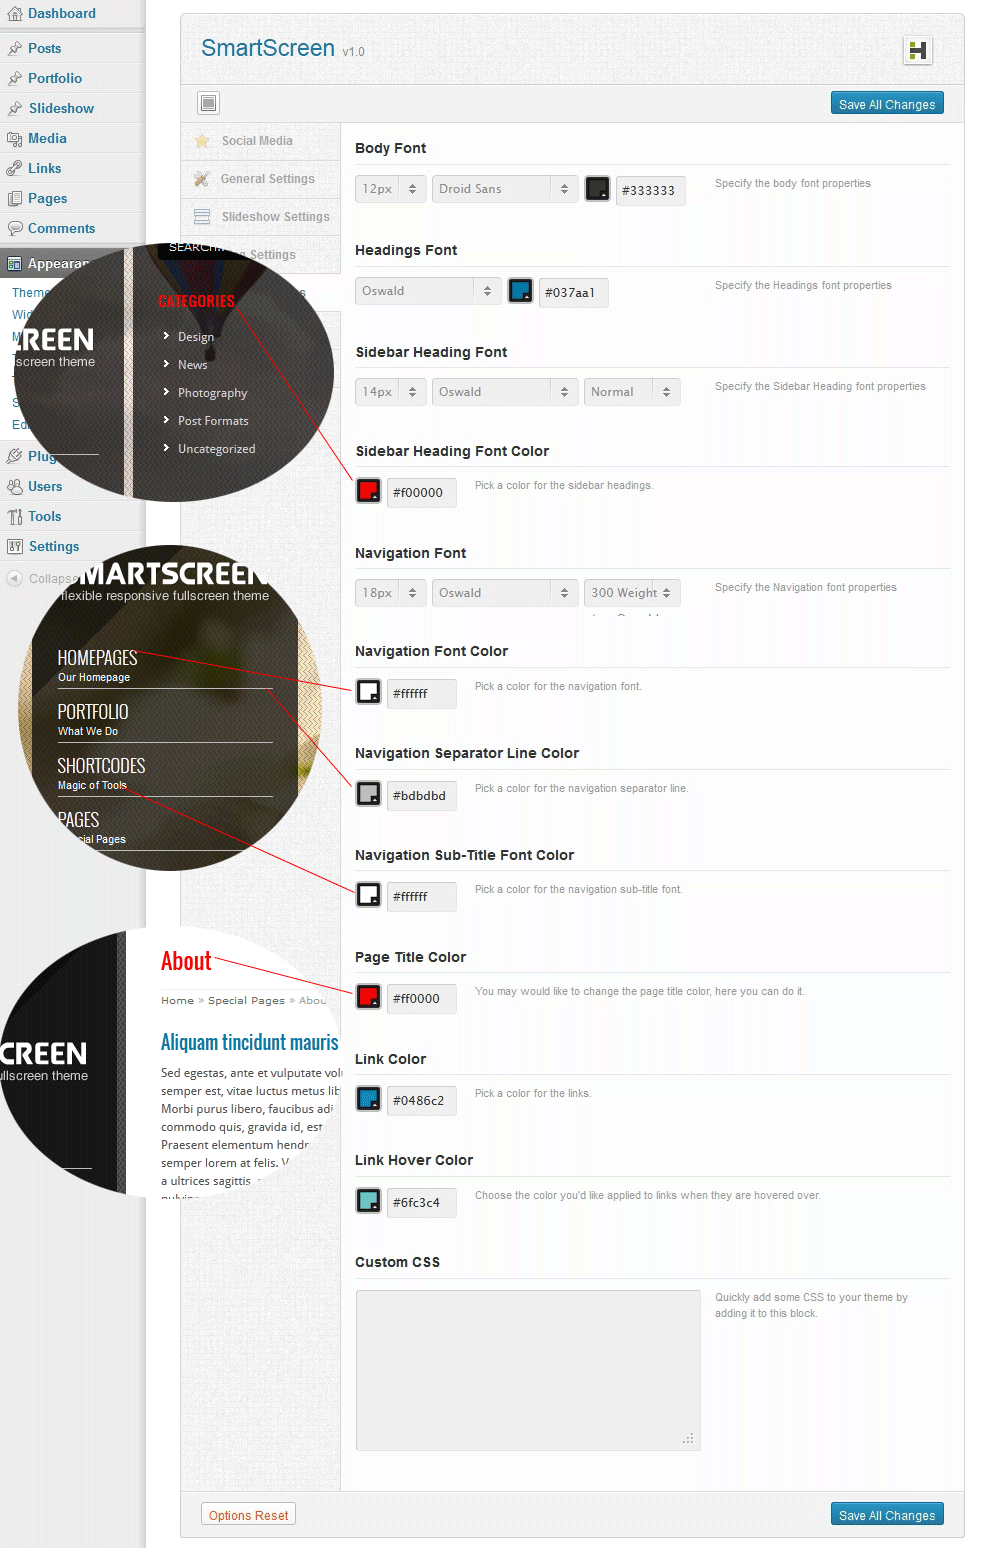
SmartScreen is one of the most customizable full screen wordpress themes. You can almost change every style and make your own unique theme. There are two sections for that in admin options:
You can have 4 different google fonts ( navigation, headings, body font, and sidebar heading).
1. Styling Options
Take look at the image below. It says itself!
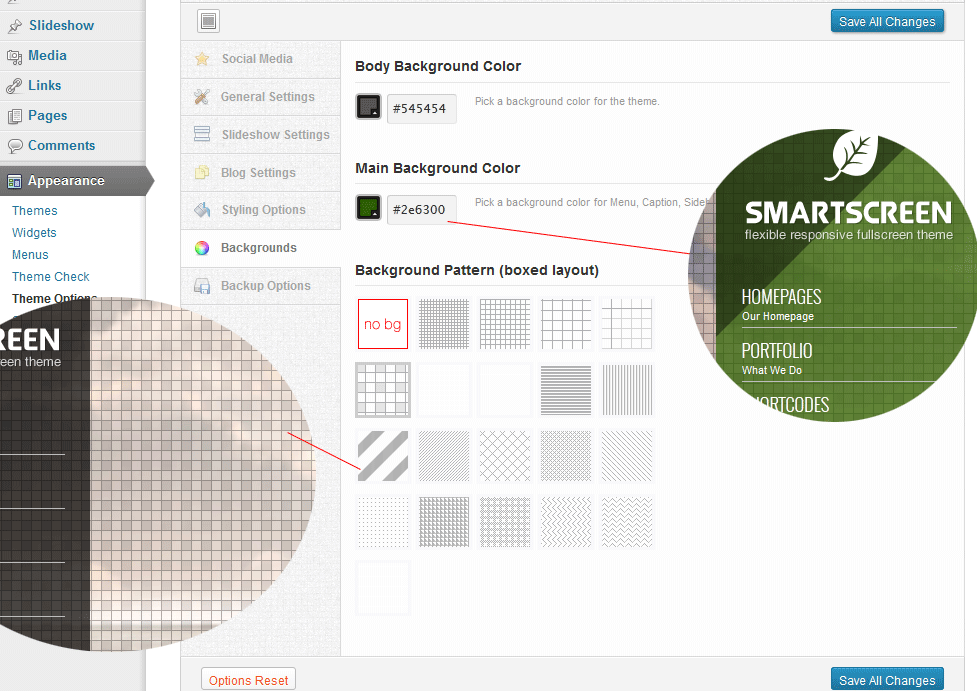
2. Backgrounds
Body background color will be handy if you disable slideshow for a post or page.
From version 2.0, smartscreen is woocommerce ready.
To set the best image sizes go woocommerce >settings>catalog>image options and set as

SmartScreen’s css file is style.css which is located at the root folder of the theme (/wp-content/themes/SmartScreen/).
Our style.css file is organized like below:*/ /* 0. CSS Reset /*-----------------------------------------------------------------------------------*/
/* 1. General Structure & Global Classes /*-----------------------------------------------------------------------------------*/
Also there are some other css files that are listed below:
- styles/ie.css – dedicated to lovely ie!
- styles/prettyPhoto.css – for prettyPhoto lightbox
- styles/flexslider.css – for shortcodes slideshow
- styles/supersized.css – for slideshow
- admin/assets/css/admin-styles.css – for admin framework
The theme comes with a lot of Javascript features. jQuery is the core library of all scripts. If you need to customize any of effects, go to /wp-content/themes/SmartScreen/scripts/ and open custom.js. We’ve used jQuery to produce fade, drop-down menu, toggle, etc, …
- jquery.js – the core lib
- css3-mediaqueries.js – for responsive layout
- jquery.isotope.min.js – for filterable portfolio
- jquery.easing.1.3.js – easing
- twitter.min.js – used for displaying recent tweets
- jquery.prettyPhoto.js – used for prettyPhoto lightbox
- jquery.flexslider-min – used for slideshow
- jquery.tools.min.js – used for tabs
- custom.js – initiating functions
- flowplayer-3.2.6.min.js – for embeding self-hosted video
- supersized.3.2.7.min – slideshow
The themes comes with 1 .psd file.
- homepage.psd – Homepage and sample page
Here you can see the list of external resources used in SmartScreen.
- jQuery FlexSlider Plug-in – FlexSlider – The Best Responsive jQuery Slider
- Supersized Jquery Plugin – http://www.buildinternet.com/project/supersized/
- prettyPhoto Lightbox: – http://www.no-margin-for-errors.com/projects/prettyPhoto-jquery-lightbox-clone
- Video – http://flowplayer.org
- Multithumb WP plugin
- Sidebar generator WP plugin (customized)
- Sort Query WP Plugin (embeded)
- WP Pagenavi
- jQuery Isotope – http://metafizzy.co/#isotope-license
- oEmbed HTML5 Audio
- Captcha – http://abeautifulsite.net/blog/2011/01/a-simple-php-captcha-script/
- TimThumb – Image resize
- Twitter js – http://code.google.com/p/twitterjs/
- Google Fonts
- Patterns : http://subtlepatterns.com/
- http://www.famfamfam.com/lab/icons/silk/
- http://www.woothemes.com/2010/08/woocons1/
- http://www.woothemes.com/2009/09/woofunction-178-amazing-web-design-icons/
- http://www.iconsweets2.com/
- http://prothemedesign.com/circular-icons/