Hello there, first of all, thanks for purchasing inCreate.
This is a comprehensive and also easy to use help file that lets you setup and uses inCreate WordPress theme. inCreate is designed really user-friendly and if you have been a WordPress user before, you won’t need to read this help file completely and that’s just enough to look at this file main titles and just read what you need.
Our theme usually gets regular updates including bug fixes and improvements. So, don’t forget to follow us on Twitter
Some Important Notes:
- Please take the time to read through the documentation, as many support related questions can be answered simply by re-reading these instructions.
- We will be happy to help you tweak the theme but just for small ones. For more advanced customizations, contact us for paid customizations.
You need to extract the ht-increate.zip file. The folder name will be “ht-increate“. You can upload it directly to your host via FTP in /wp-content/themes. Then you can simply activate inCreate as you would activate every other WordPress theme at Appearance -> Themes.
Also, you can use “ht-increate.zip” file in WordPress theme uploader section in order to install the theme via WordPress directly.

Remember that after activating inCreate, you would be notified about installing a few plugins. In this section, we show you how to activate one of them which is named “Revolution Slider”. The notification window is like the image below. As you see, there are three plugins that you need to install: Revolution Slider, Contact Form 7 and Page Builder.

Click on Begin installing plugin on the appeared box to go to another page called Install Required Plugins, then hover your mouse over Revolution Slider to install link appears.

Then click on Install and wait until the plugin is installed. When the plugin get installed successfully, you would see a link named “Return to Required Plugins Installer”.

Activate the plugins as shown below.

Finally, click on it to finish installing and activating “Revolution slider plugin”.
You can also do the above steps for the other plugins to activate them.
It’s so easy to create your homepage via inCreate.
To do it, just follow the steps below:
STEP 1:
On the WordPress admin dashboard, Go to Pages -> Add New. Then create a page and name it homepage (for example):
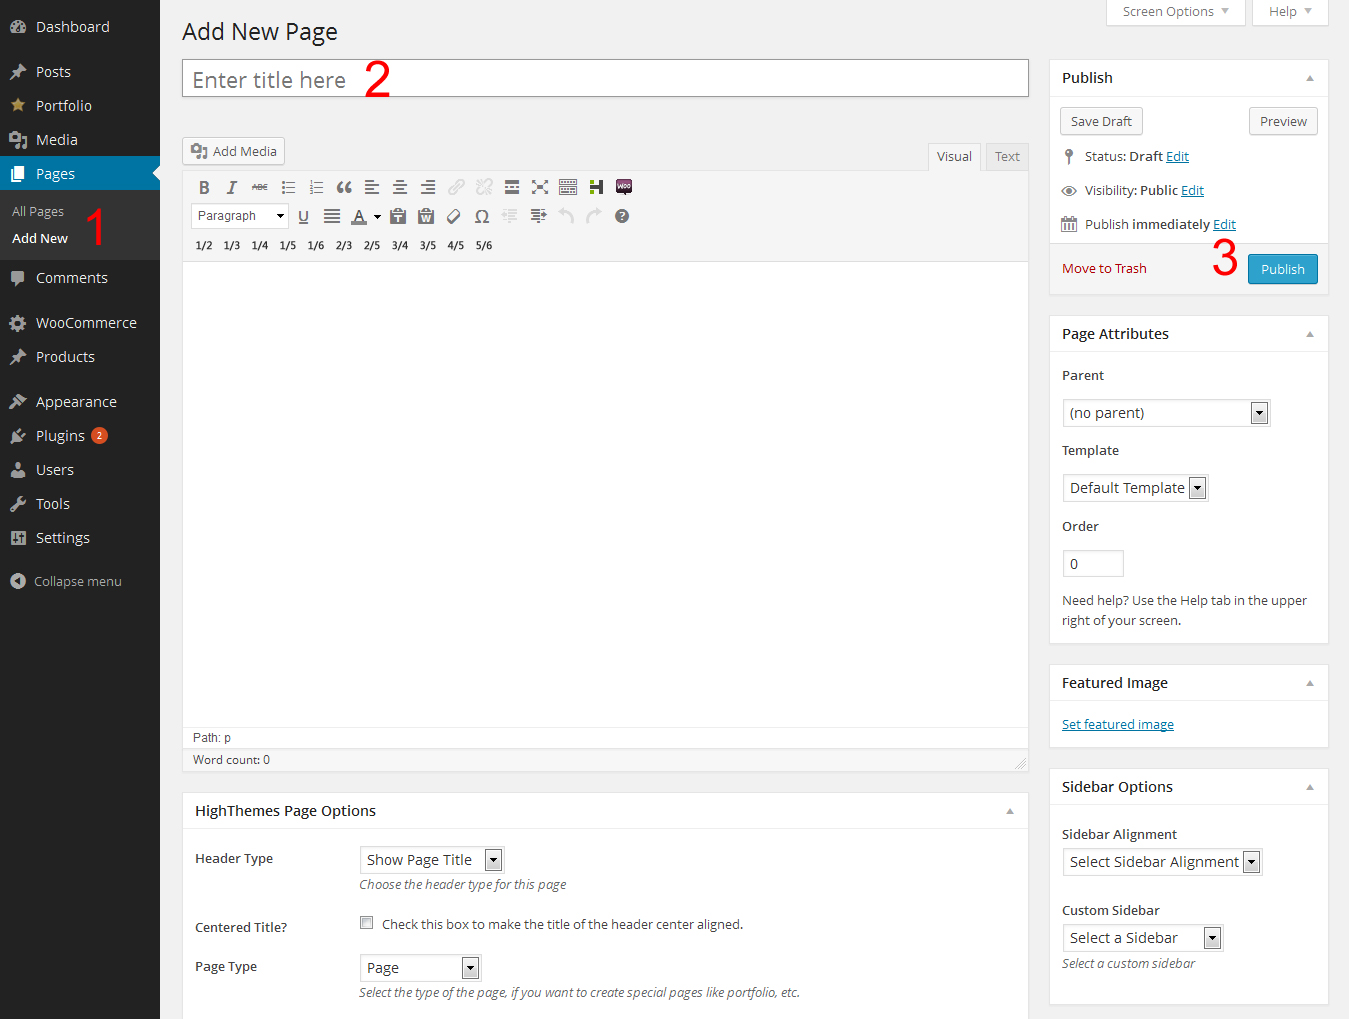
Now scroll down to HighThemes Page Options and make your tweaks there.
For example, if you would like to start your home page with a slider, set the Header Type option to Revolution Slider

Next go to Setting->Reading, choose A static page and select Homepage (which you created in the previous step) and save changes:
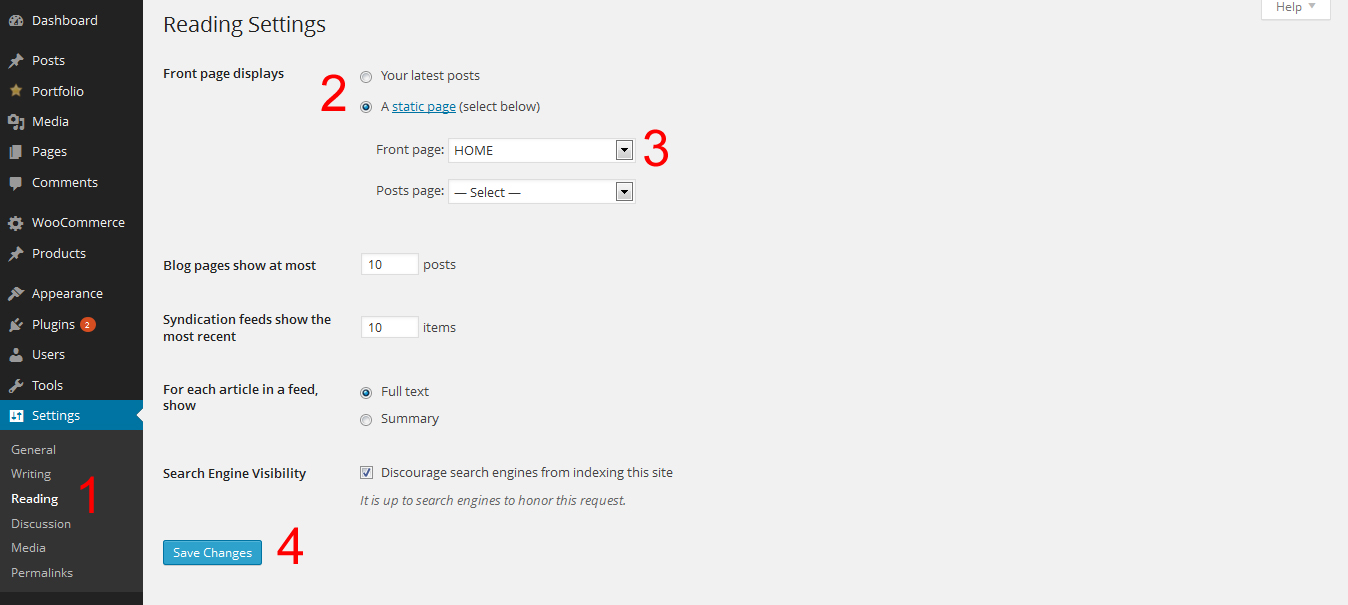
Finally, click Save Changes to finish.
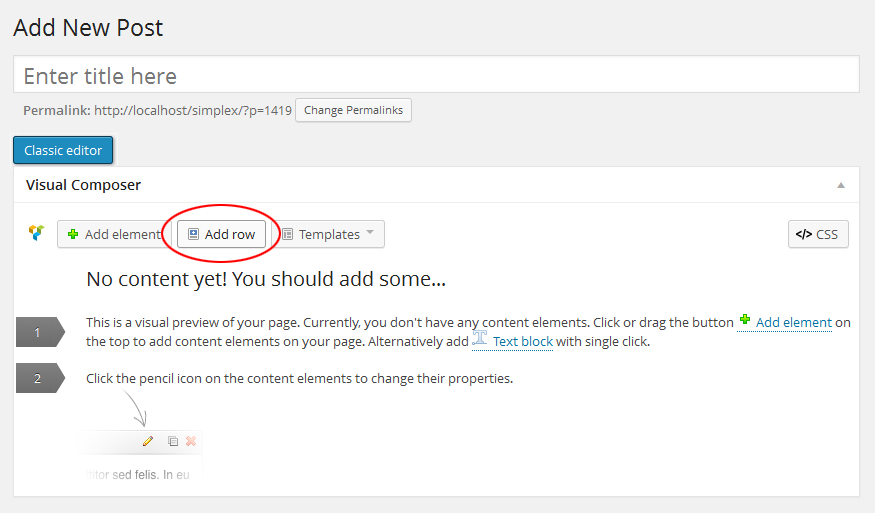
inCreate comes with a powerful page builder. When you want to create a new post or page, first of all, click on Visual Composer button to be able to use inCreate page builder features.

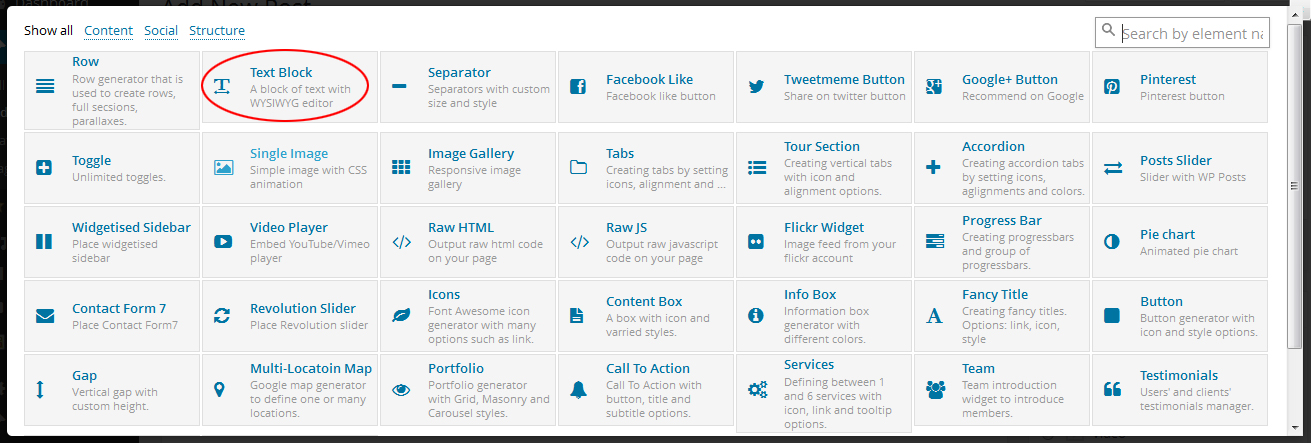
On the appeared window, you can simply add your desired rows and then you can add elements on each row.
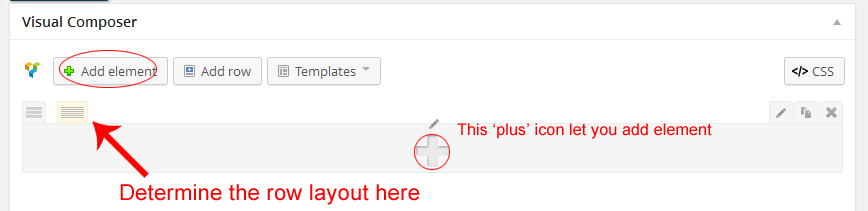
You will see many elements that you can simply add them to your pages by clicking on them and tweaks your desired options.
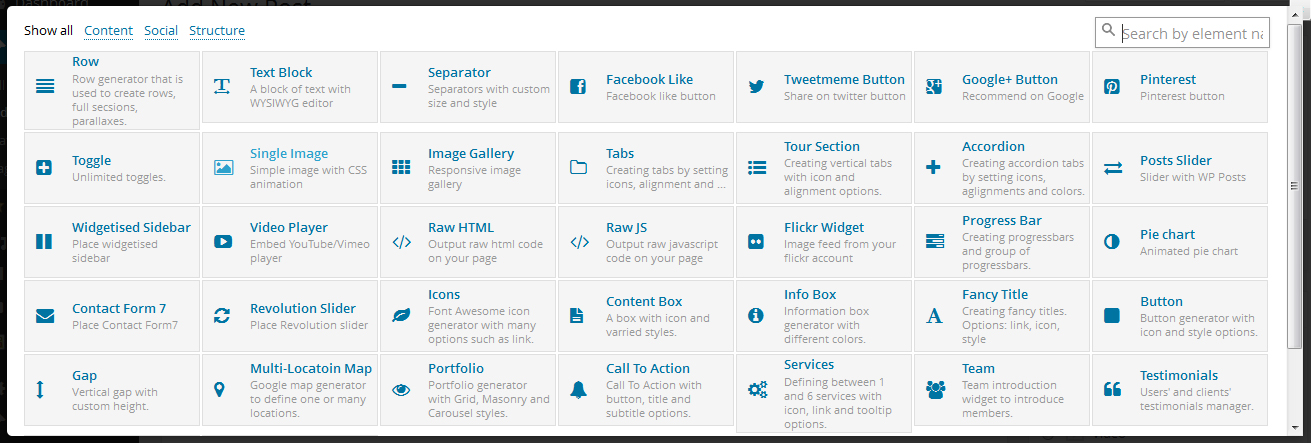
Note: The picture above just shows some of the elements and some other elements comes in the classic text editor to let you insert some inline elements amoung your words and etc.
In order to use these elements click on Text Block as we are showing in the picture below:
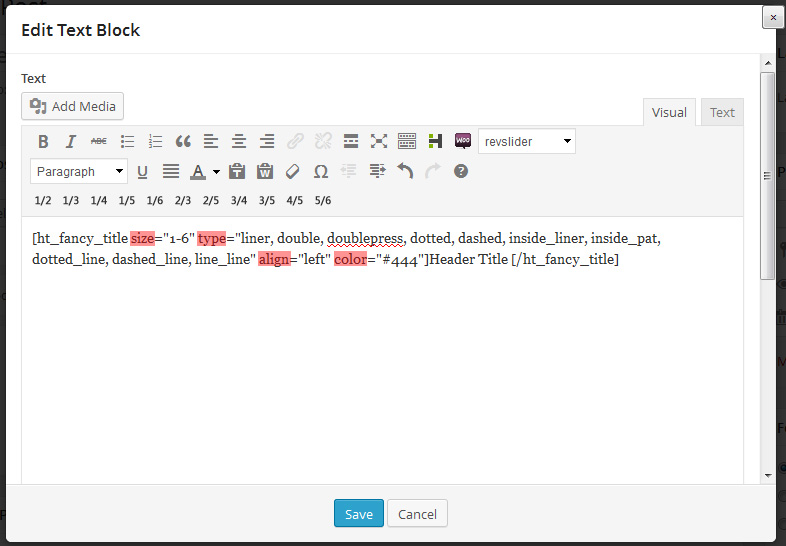
Then on the appeared window, click on the specified icon like the picture below:

Next, you will see that a new window pops up like the image below:
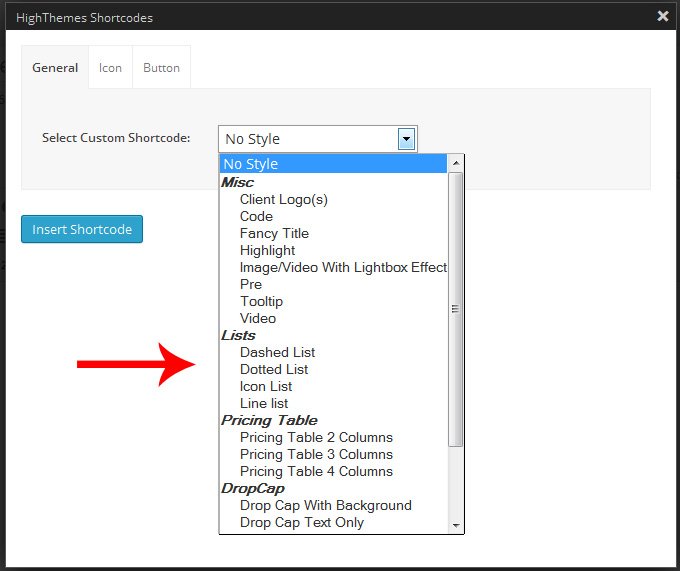
You will have three tabs there: General, Icon, and Button.
As we are showing in the picture below, General tab contains many elements. You can select your desired shortcode (element) there and finally click on Insert Shortcodebutton to insert the shortcode into the WISWIG editor.
Note that Button tab and Icon tab provide some visual options for you. But when you want to use an element from General tab and click on the ‘Insert Shortcode’ button, the shortcode would be inserted into the WISWIG editor automatically and then you can edit the option you want there.
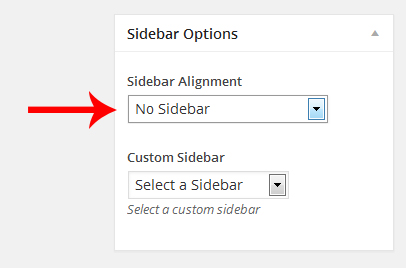
You very often will need to create full-width sections on your posts or pages. So first of all, disable sidebar on the page or post that you want to have a full-width row (full-width section) there:
Then you can simply follow the steps below to do it:
Step 1:
Create a new post or page or open a premade post or page and then on the WordPress editor click on Visual Composter button.
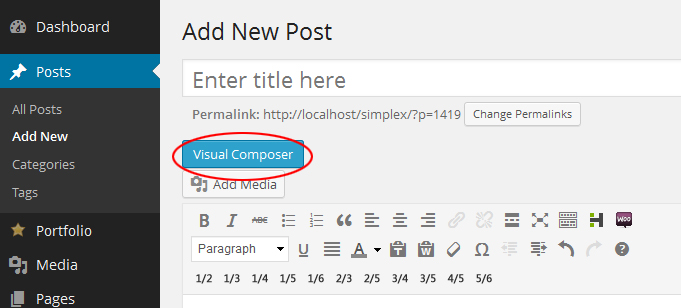
Step 2:
On the appeared window, click on Add Row button:
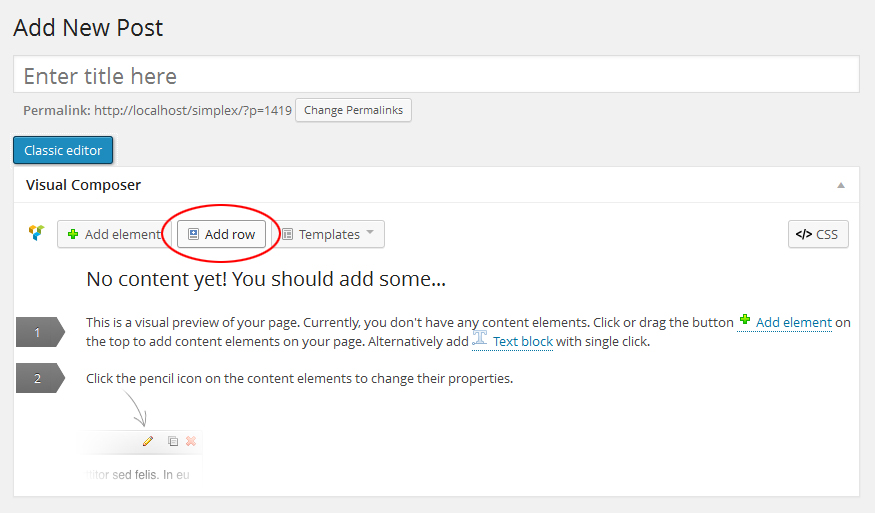
Step 3:
Now you have created a row and just should set it as a full-width row (full-width section). So, click on Edit Row Button as is shown in the picture below:
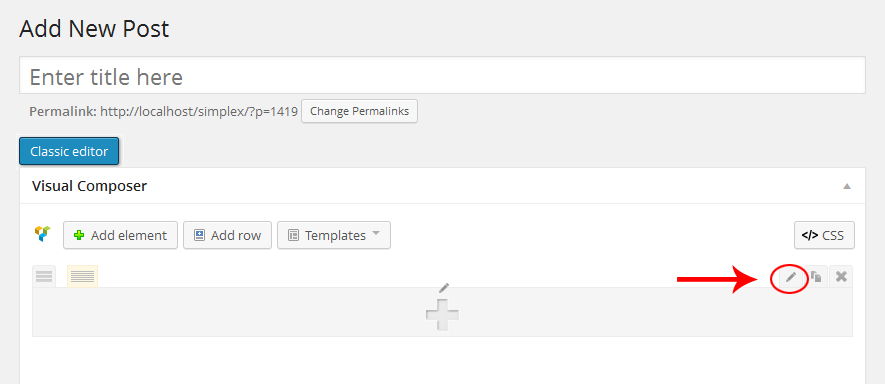
Step 4:
On the appeared window, just check Full-width section option: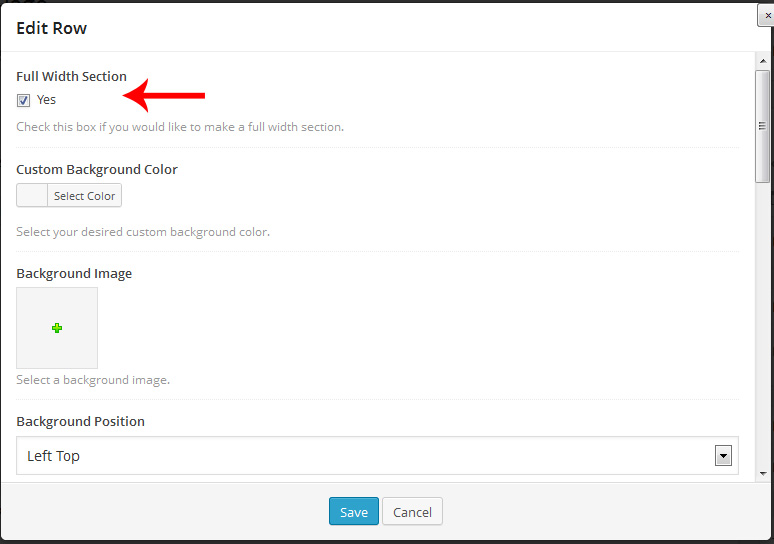
As you will see, you have many options there, including background color, background image, background position, padding and …
Note that when you create a full-width section, its content would be placed from left to the right side of the browsers. So, you can create full-width sliders, portfolios, galleries and … with full-width sections
inCreate uses a custom post type for portfolio items. As you see there is a new item added to the dashboard sidebar, which is titled “Portfolio”. inCreate provides some amazing and useful features that you may use them with portfolio items.
To see all of the portfolios, on WordPress admin dashboard, click on Portfolio from the left sidebar.

Managing Portfolio Categories
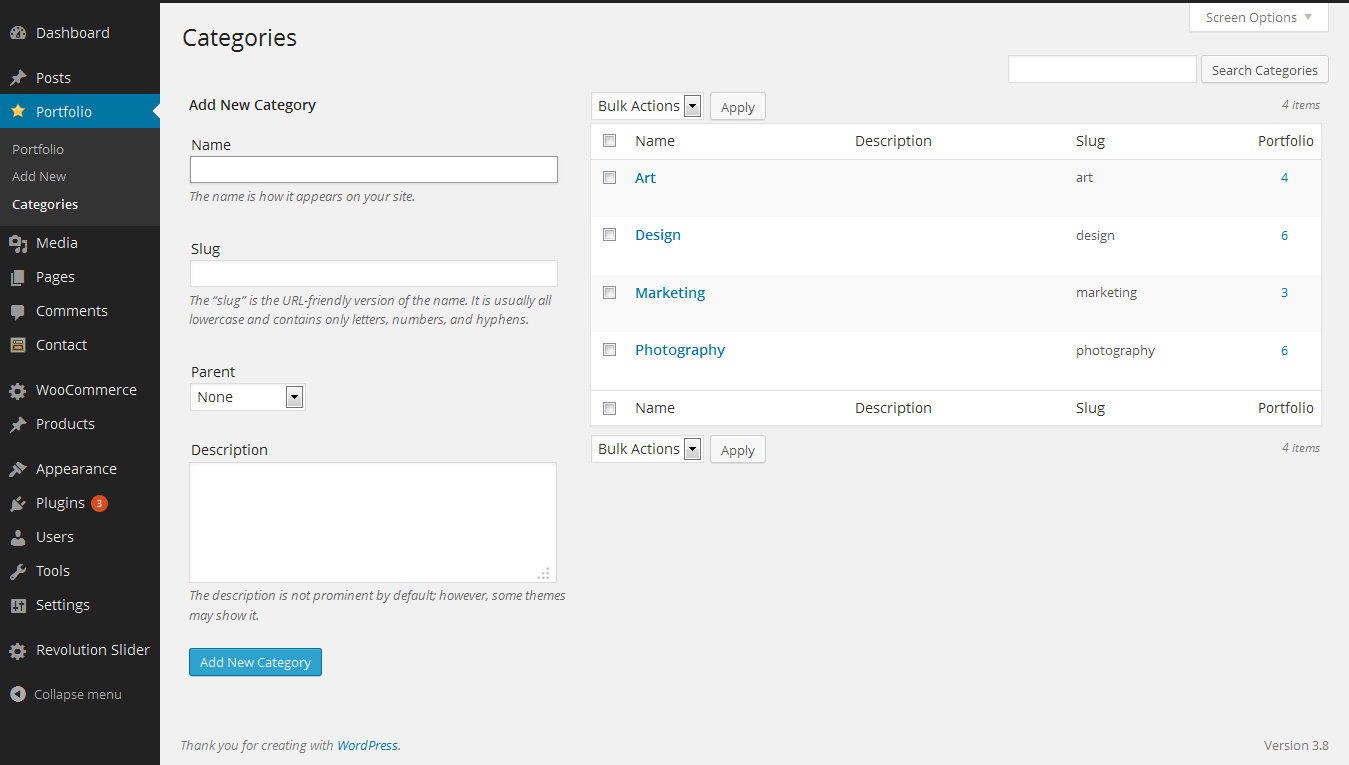
You can easily manage portfolio categories just as like as you do it for your posts. Go to Portfolio -> Categories on WordPress admin dashboard:
Creating a new Portfolio
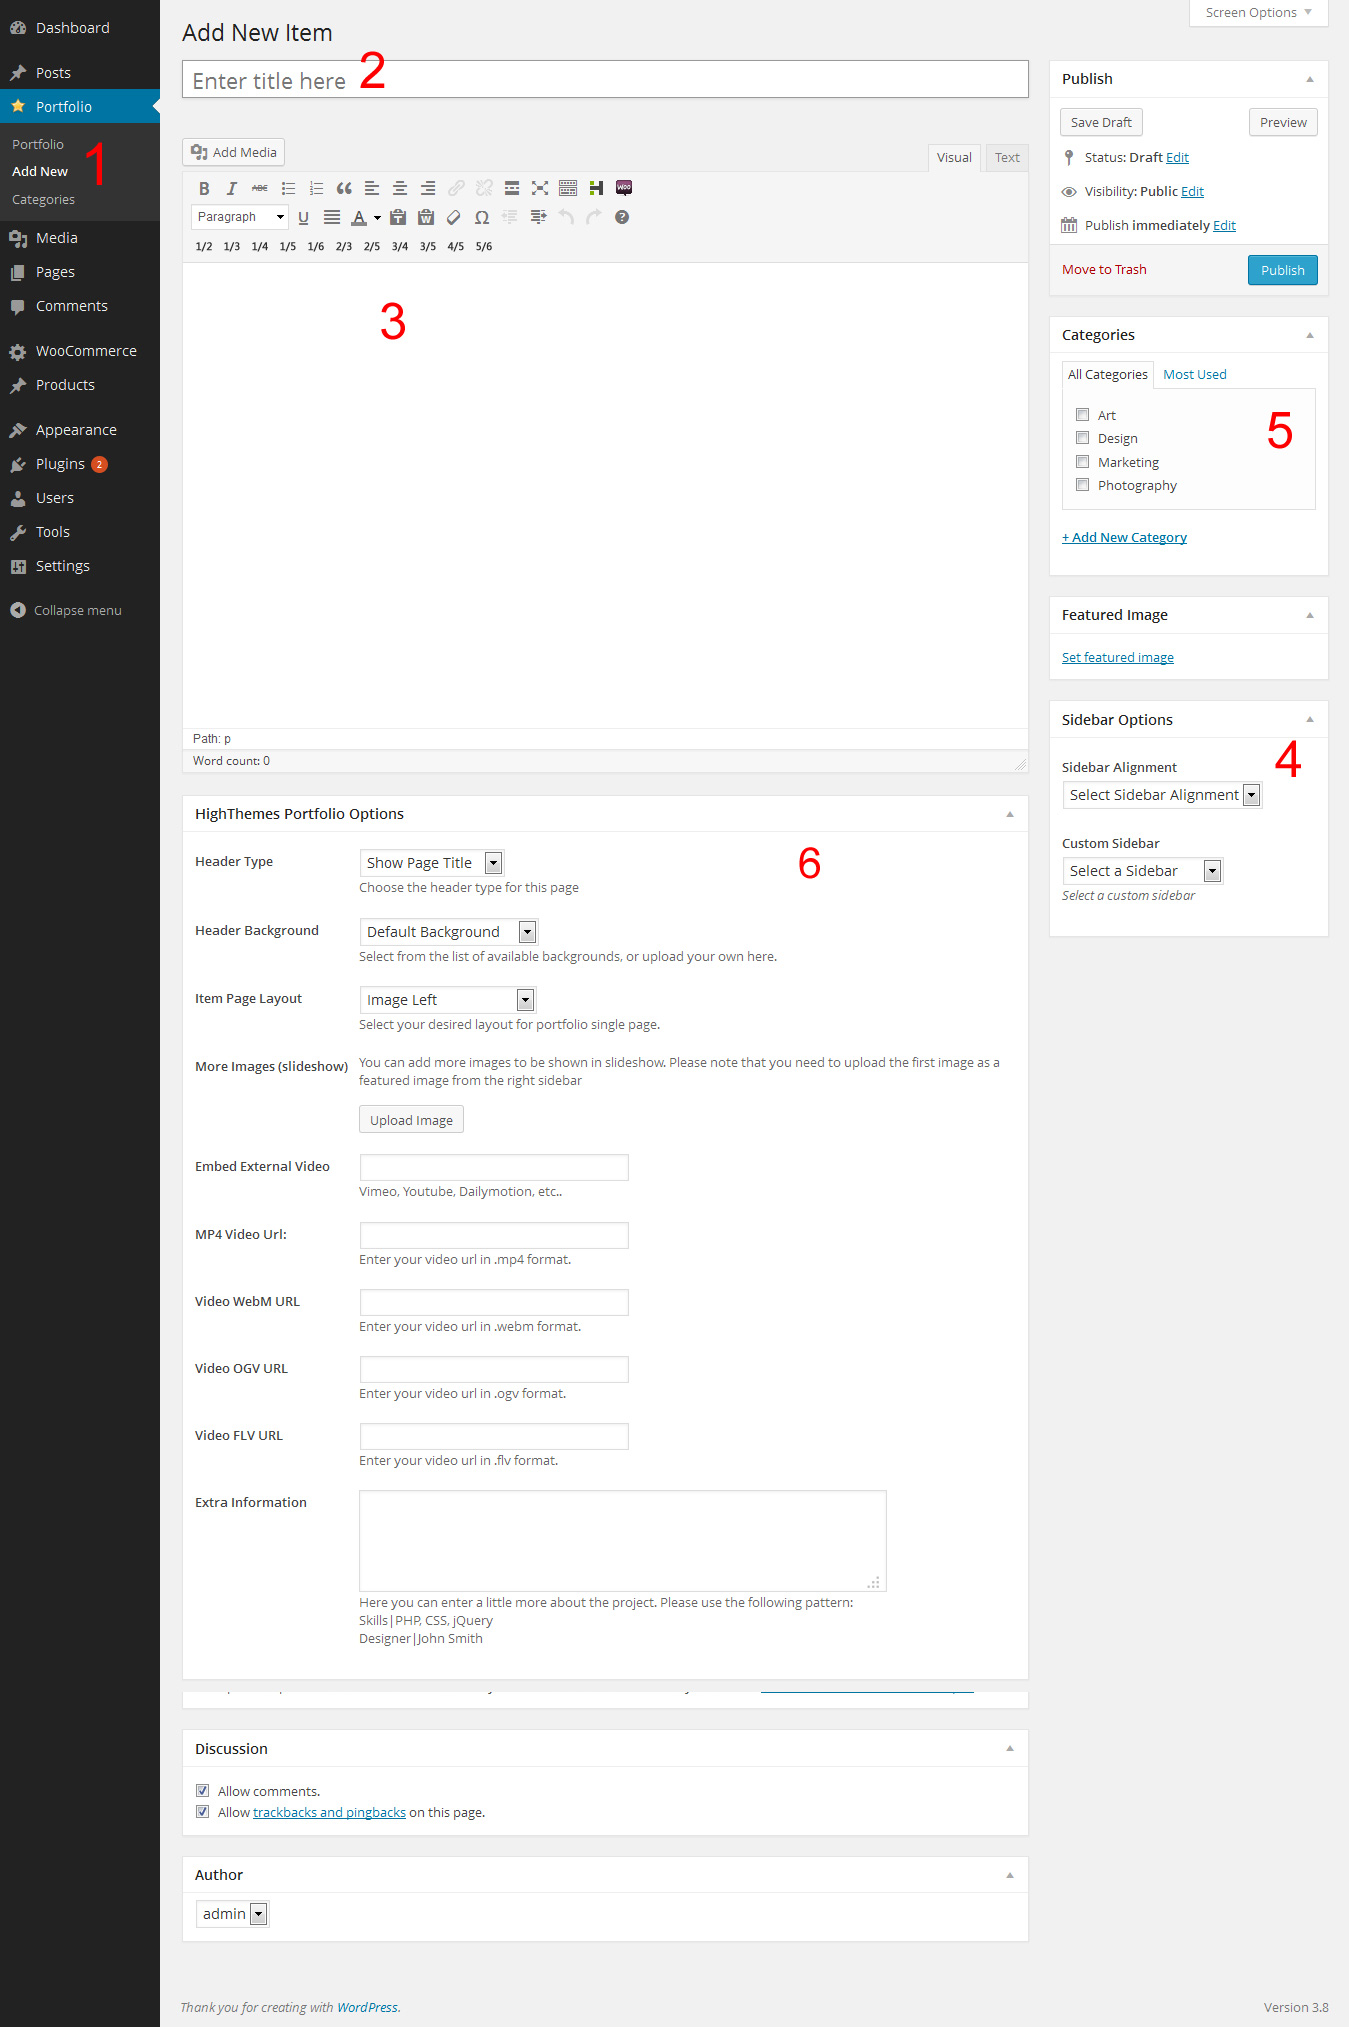
You can easily create and manage your portfolios. To create a new portfolio, go to Portfolio -> Add new (1). Then you can simply determine portfolio name (2), write your desired content (3), set sidebar options (4), check portfolio categories (5) and finally scroll down to ‘HighThemes Portfolio Options’ and set portfolio options there (5).
Note: As you see, you can have your desired sidebar in your portfolios and determine sidebar alignment.
Portfolio Theme Options
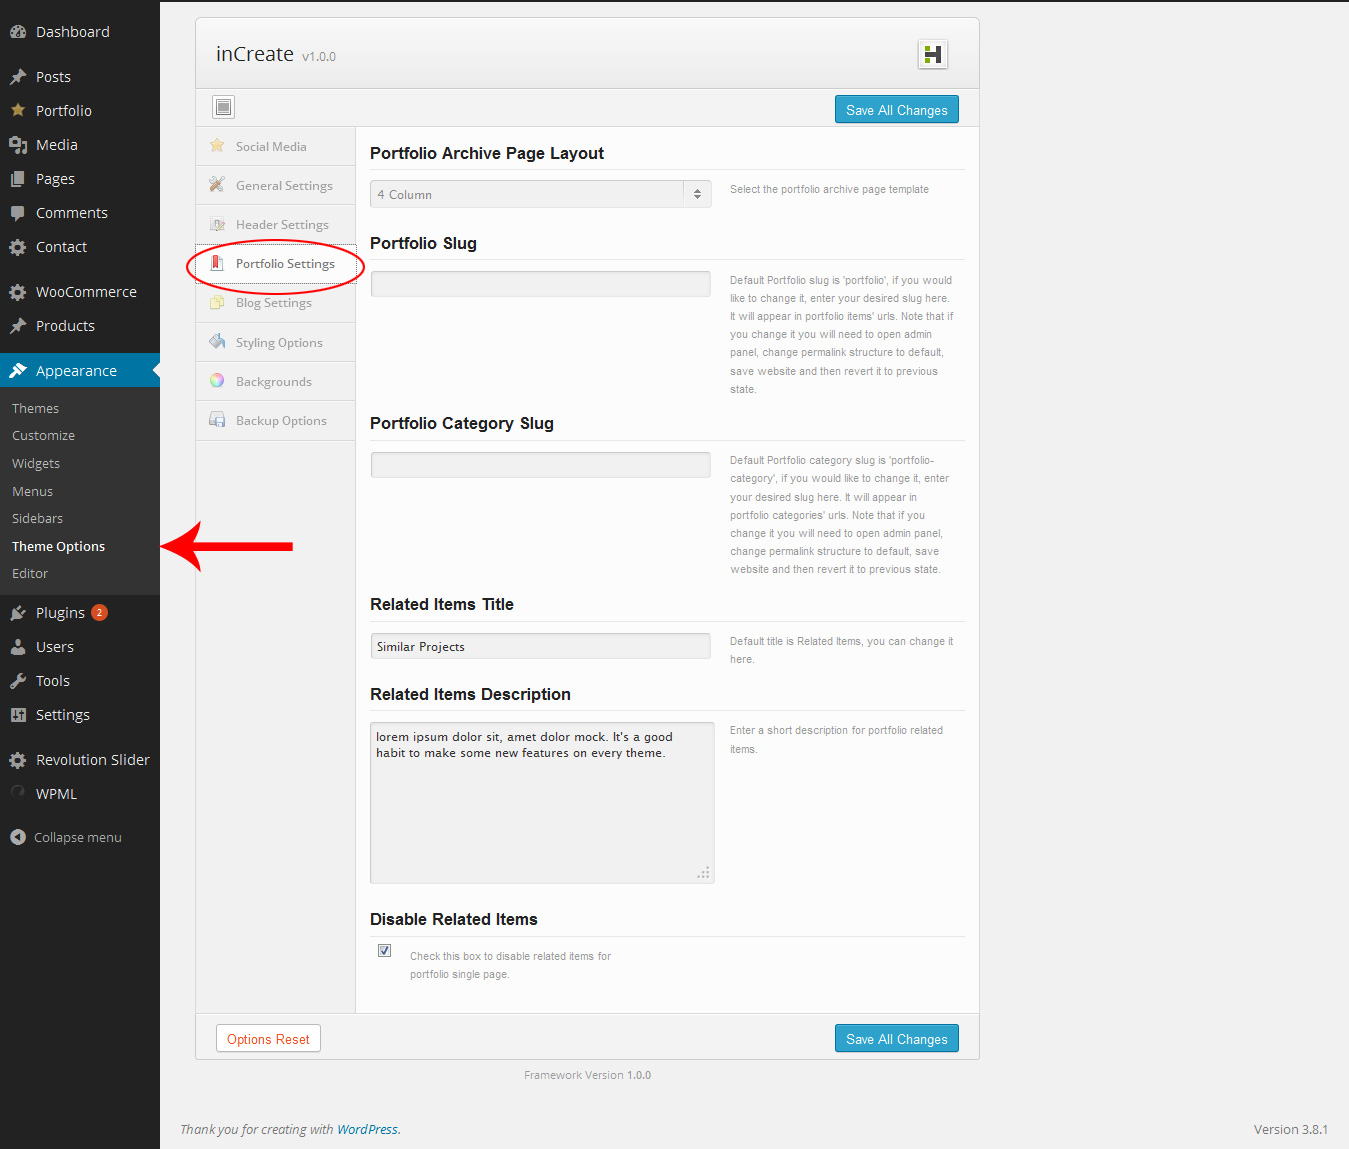
inCreate provides some practical portfolio options. You can access these options on inCreate theme option, on Portfolio Settings tab:
Portfolio Shortcode
You can also put your portfolios and galleries everywhere you want via inCreate shortcodes.
To put portfolios on pages or posts, switch to Visual Composer editor, then add click on Portfolio from the list of shortcode elements: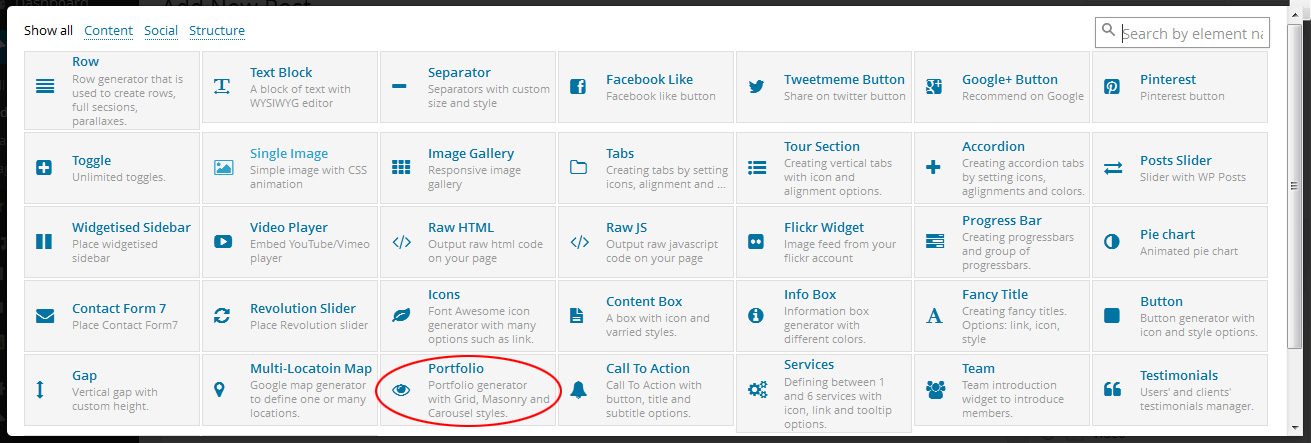
You can also put your image galleries in your posts and pages via another element called Image Gallery:

inCreate works with a great Slider plugin which is named “Revolution Slider”. As we covered this subject before, this plugin is into the theme folder and you can setup that after activating the theme.
So, let’s just take a look at some top features of this plugin. Revolution slider is a fantastic WordPress plugin that lets you create your slider, edit them on WordPress admin dashboard, Some top features are:
- Drag & Drop Editor
- Set FullWidth, Responsive or Static size.
- Import / Export Sliders
- Set Countdown time per slide and/or Global
- Set the Position of Countdown
- Add Unlimited amount of Captions
- FullScreen Support
- Set differentEnd and Start Transitions of Captions
- Set Fullscreen YouTube and Vimeo Videos
- For quicker start use Lazy Loading
- And …
Revolution Slider first page in admin dashboard:
On the WordPress admin dashboard, go to Revolution Slider to see the list of premade sliders there.
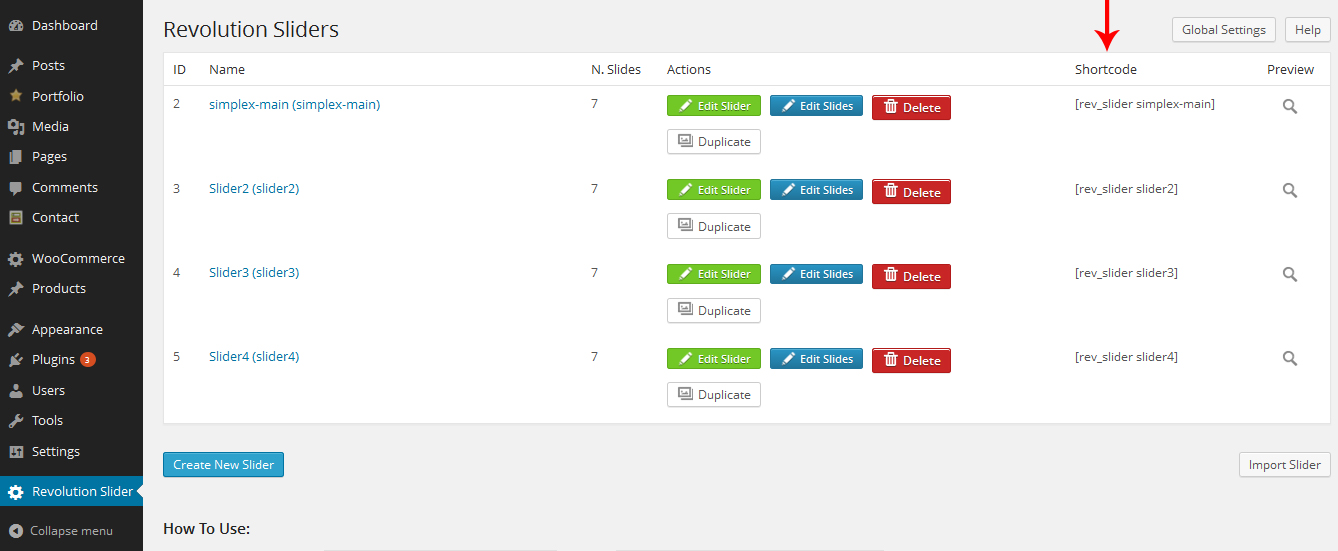
- As you see in the picture above, you can edit delete or duplicate every item. One more important tip here is that every slider has a dedicated shortcode and these shortcodes enable you to put your sliders everywhere you want such as posts, pages, sections, sidebar widgets, footer widgets and …
Importing sample revolution sliders
Revolution slider also lets you export and import your sliders data. Thus, you can easily transfer your sliders’ data from one WordPress website to another one. If you would like to try some sliders that have made before, you can see some more sample sliders and import files here:
http://www.themepunch.com/codecanyon/revolution_wp/exports.php
Using shortcodes
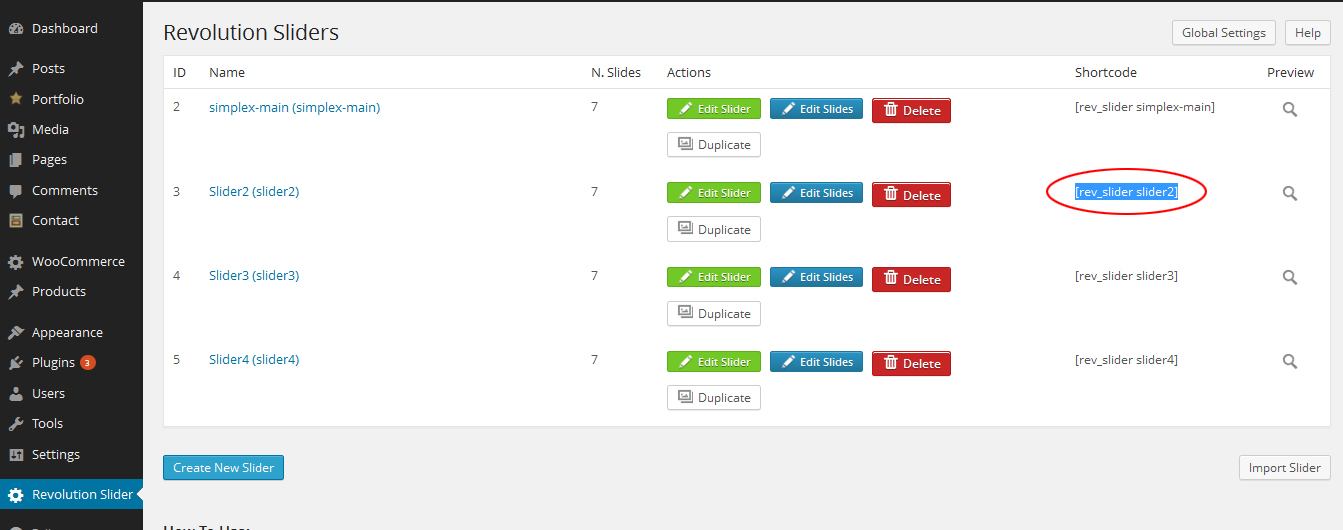
As you saw in the picture above, Revolution slider generates one shortcode for every slider. So, you can simply copy each slider shortcode and just paste it where you want.
In this example we are copying [rev_slider slider2]:
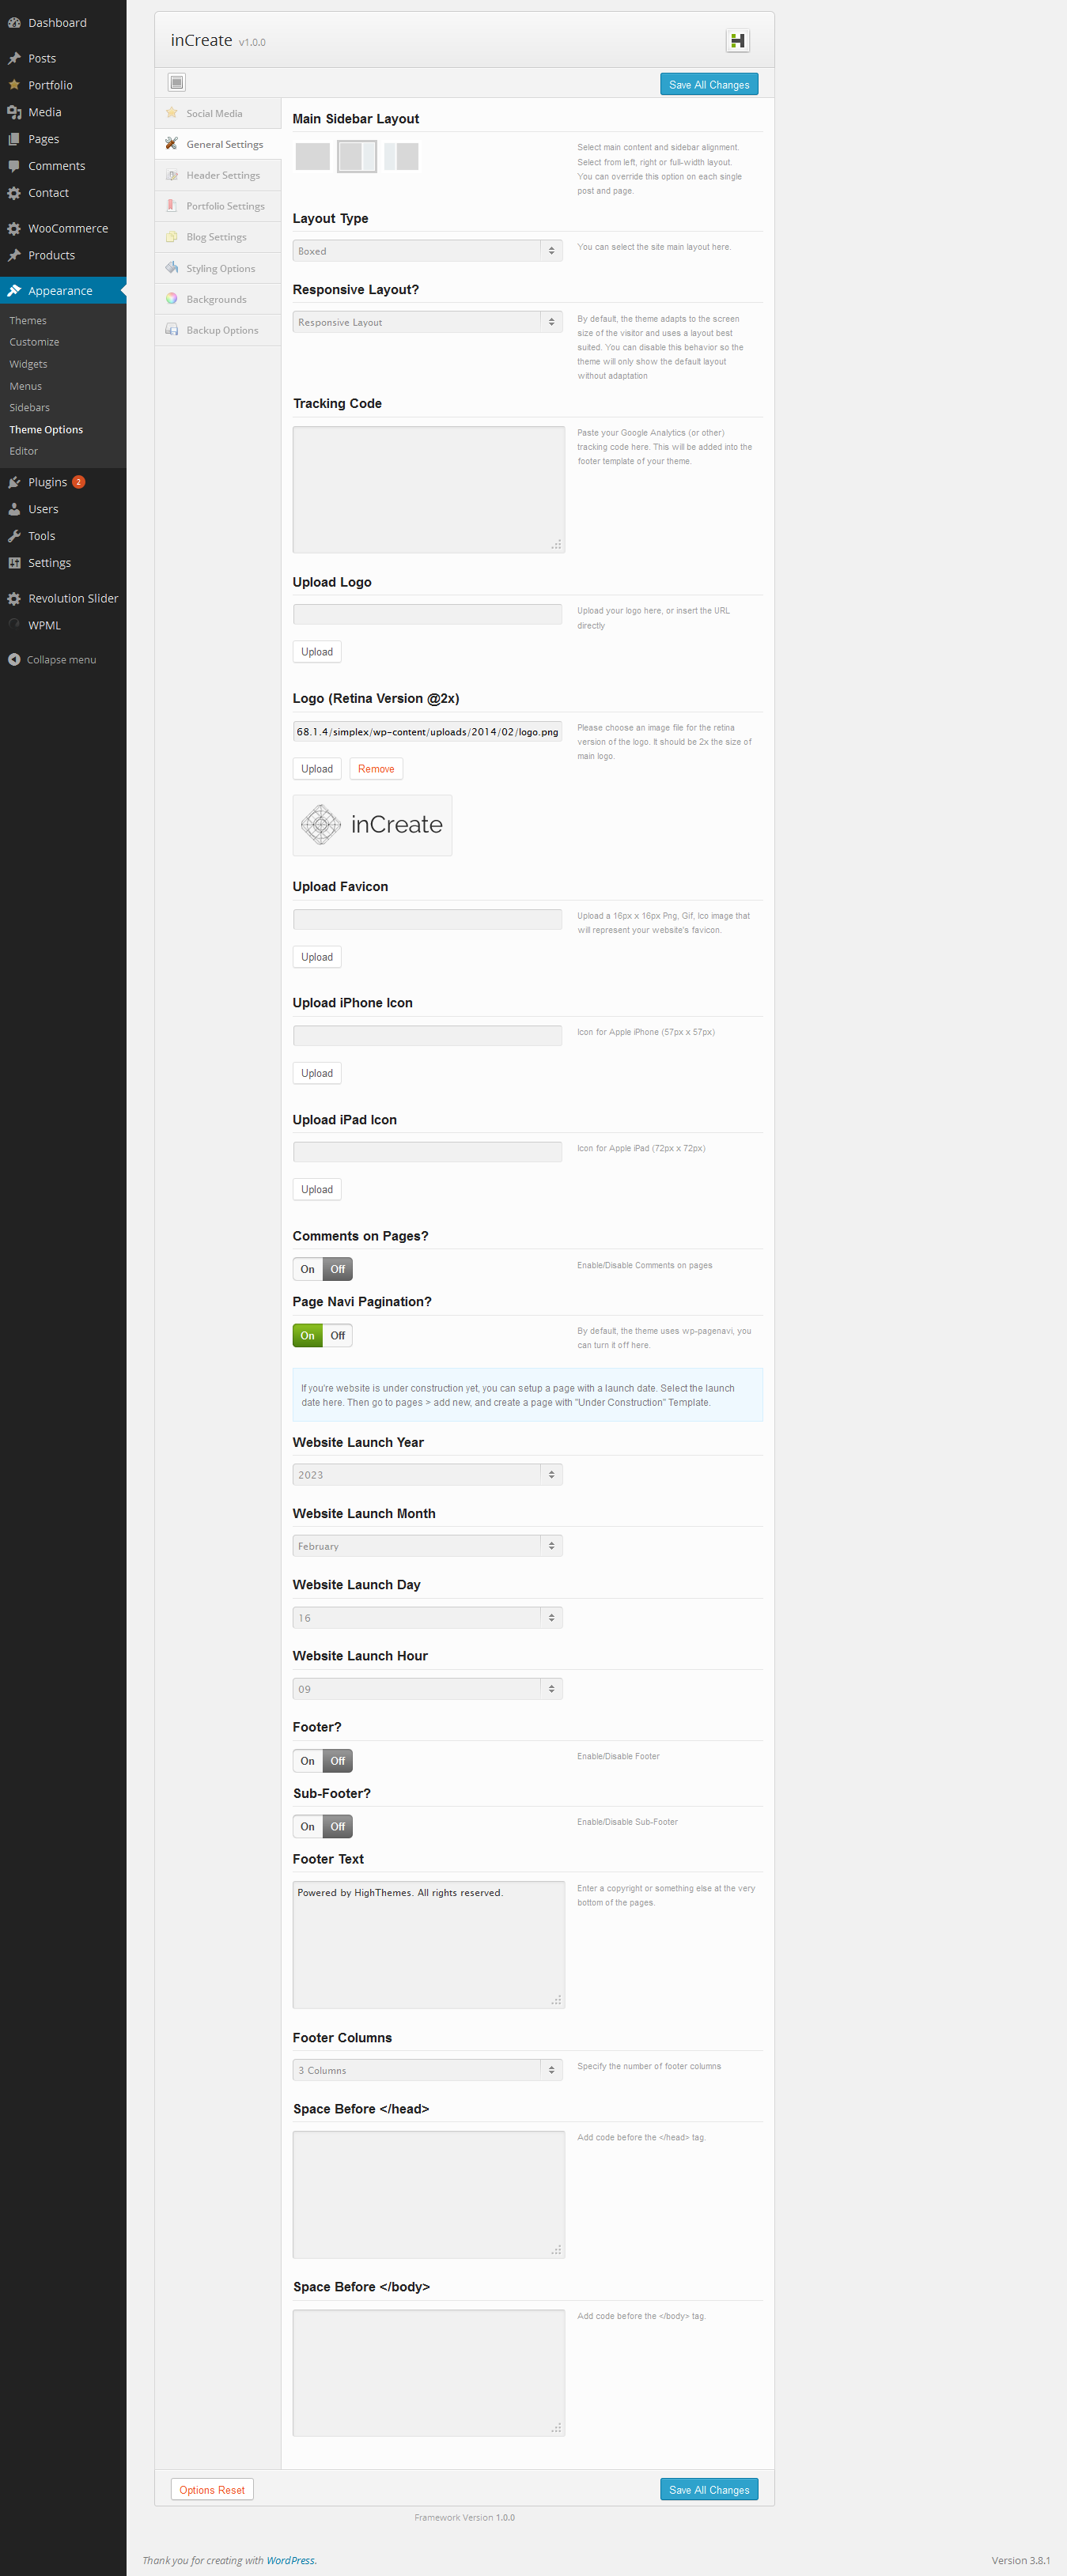
In this section, we will take a look at the general settings of the theme. There is no need to explain each section because each section comes with a clear description. One of the important sections is Main sidebar layout which is explained below.
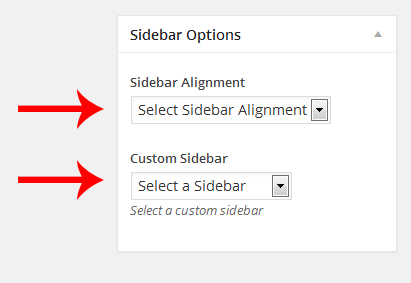
Main Sidebar Layout: Here you can change the overall sidebar alignment for pages. For example, you like to have left sidebar for all pages so you can choose it now. If you want to exclude a page or post from this layout, you can override it when you create a page/post on “Sidebar Options” which will be explained later.
inCreate comes with two blog types. blog and masonry blog. For both of these blog types you can create a page, then scroll down to HighThemes Page Options, then select “Blog” or “Masonry Blog” as the Page Type. This is the only difference option and other options are the same for both of them.
NOTE: Blog and Masonry blog are different in showing posts in user front-end. On Blog page type, posts are shown in on the column but Masonry blog page type is a grid layout page.
You can see a sample created blog page in the picture below:
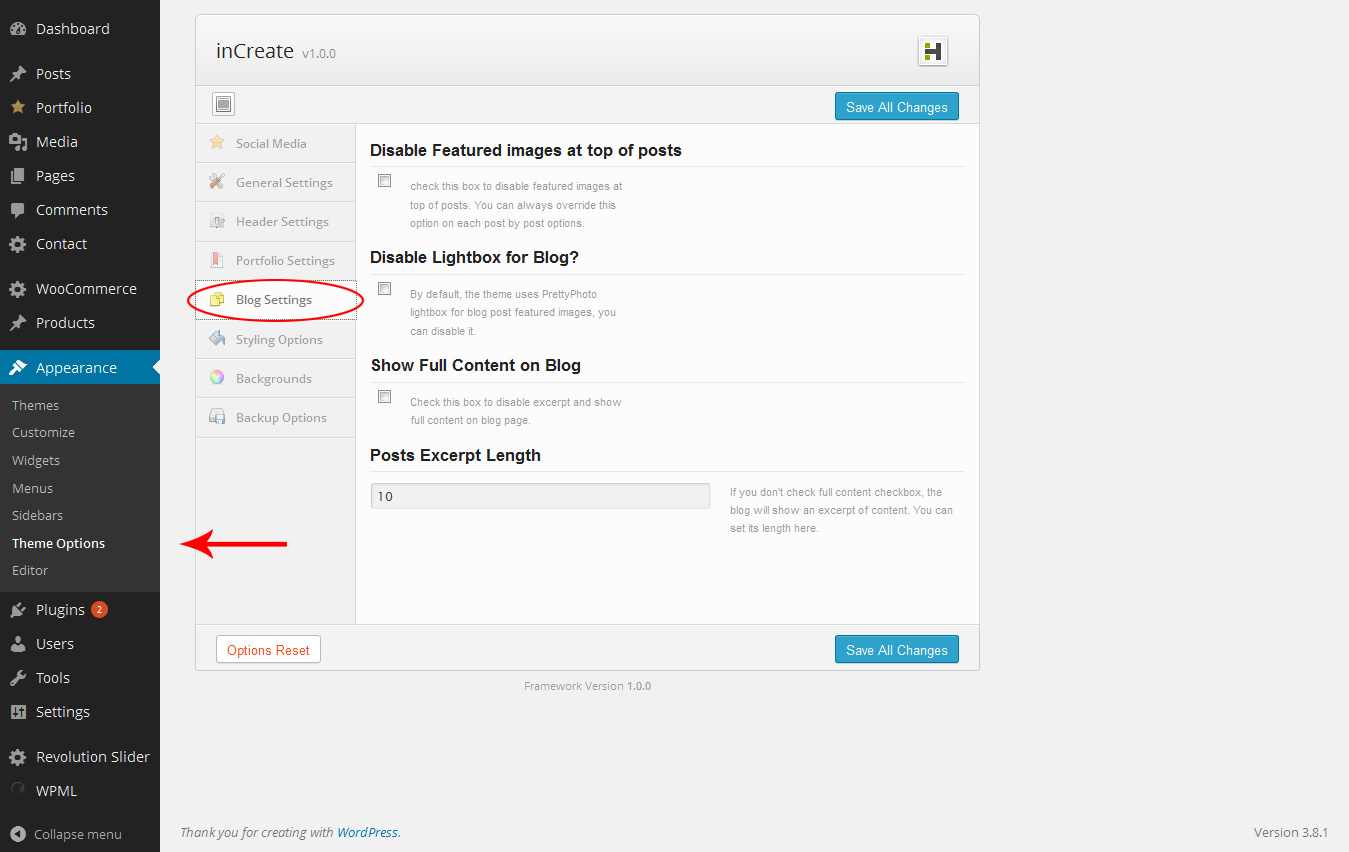
inCreate provides some blog options that let you have your ideal options. On the WordPress admin dashboard, go to Appearance -> Theme Options and then go to Blog Settings tab to set these options up:
inCreate uses Contact Form 7 WordPress plugin. This plugin enables you to create your desired forms and generates one shortcode for each created form.
You can easily use these shortcodes on your pages, sections and widgets. Therefore you would be able to put your forms almost everywhere you want.
Contact Form 7 Page
As you see in the picture below, every generated form has a specific shortcode.

To setup, a contact page, first of all, create your desired contact form and copy the generated shortcode.
Then go to Pages -> Add New then put your title and content and paste the copied shortcode there:
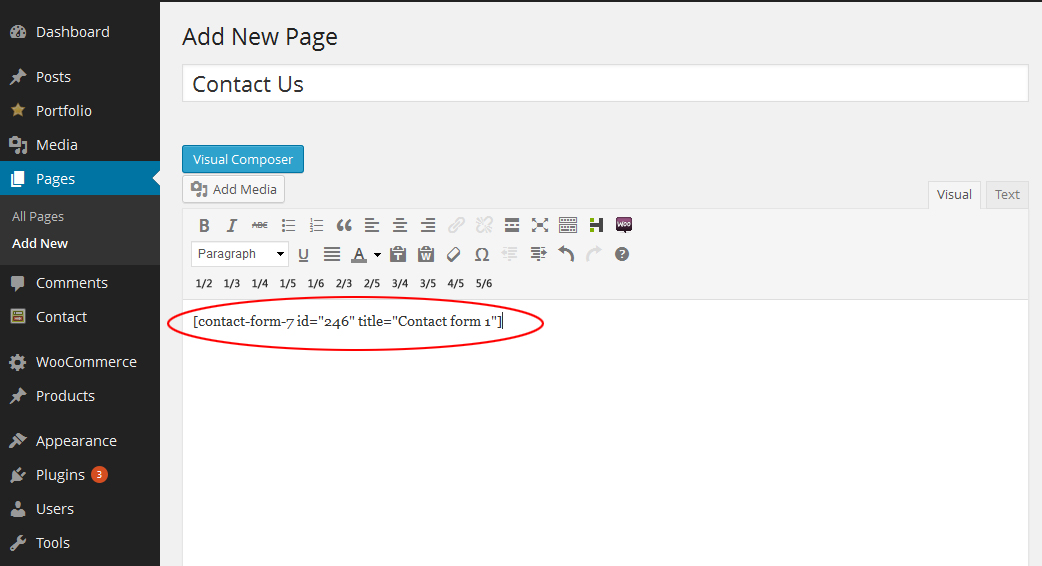
You can simply put your contact forms into your posts exactly as like as you do it for pages.
Adding Contact Forms To Widgets
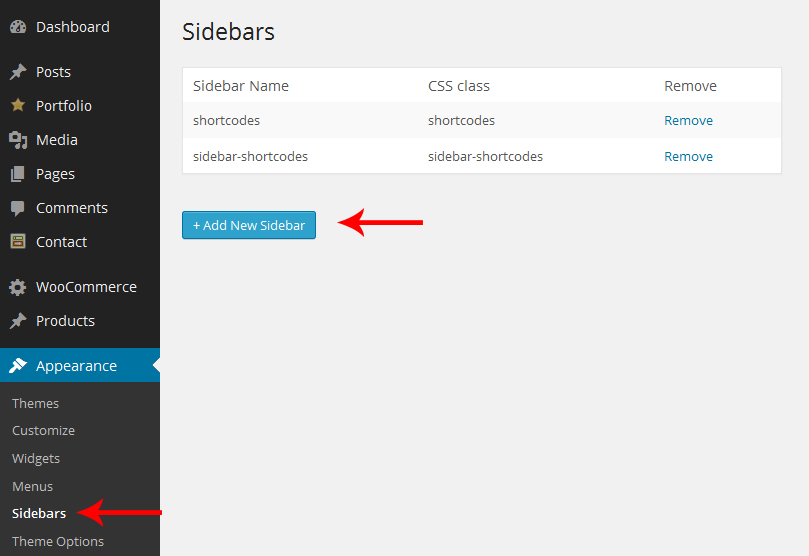
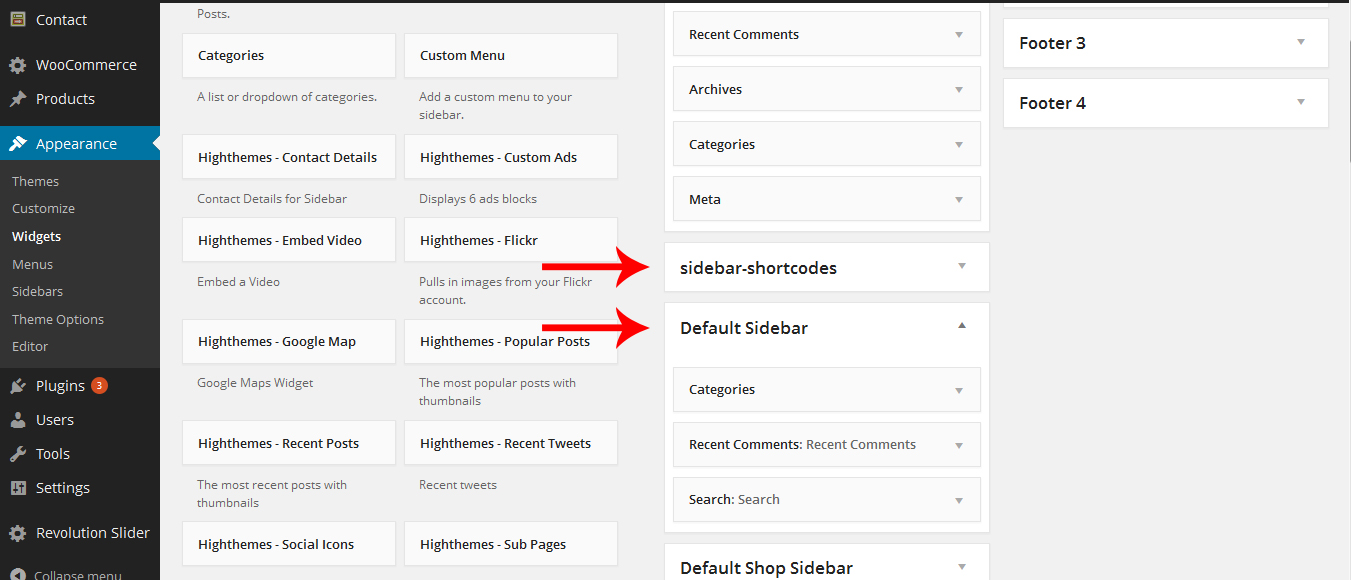
As we said about sidebars and widgets in previous sections, inCreate has some predefined widgets and sidebars and also lets you create your desired sidebars.
Well, you can also put Contact Form 7 generated shortcodes into your sidebars via a text widget. To do this simply add a text widget to the sidebar you want to have a contact form in:

Then insert the widget title and paste the copied shortcode of your desired form that is generated by “Contact Form 7” into the widget content area:
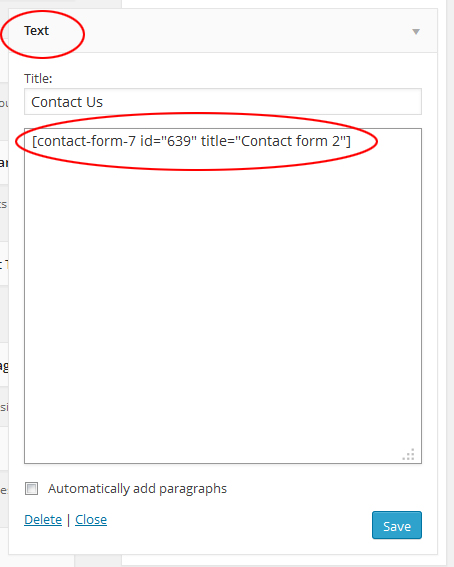
Finally, click “Save” button to save the changes.
As you see, you can create your desired contact forms and put theme almost everywhere you want. You can have contact forms on the pages, posts, columns, sidebars and footers.
inCreate supports one custom template page, which is named Under Construction. When you want to create an Under Construction page, on WordPress admin dashboard go to Pages -> Add New, then you would be able to see the box below on the right sidebar. You can change Template option value to Under Construction and then press “Upload / Publish” button to save changes. Then you would have an Under Construction page with its special page design and functionality.

inCreate supports some useful post formats. When you select a post format (while editing or creating a post), you will have specified options under HighThemes Page Optionswhich would be related to the selected post format of yours.
For example, when you select link post format, you should scroll down to HighThemes Page Options to set a value for External Link for Link Post Format.
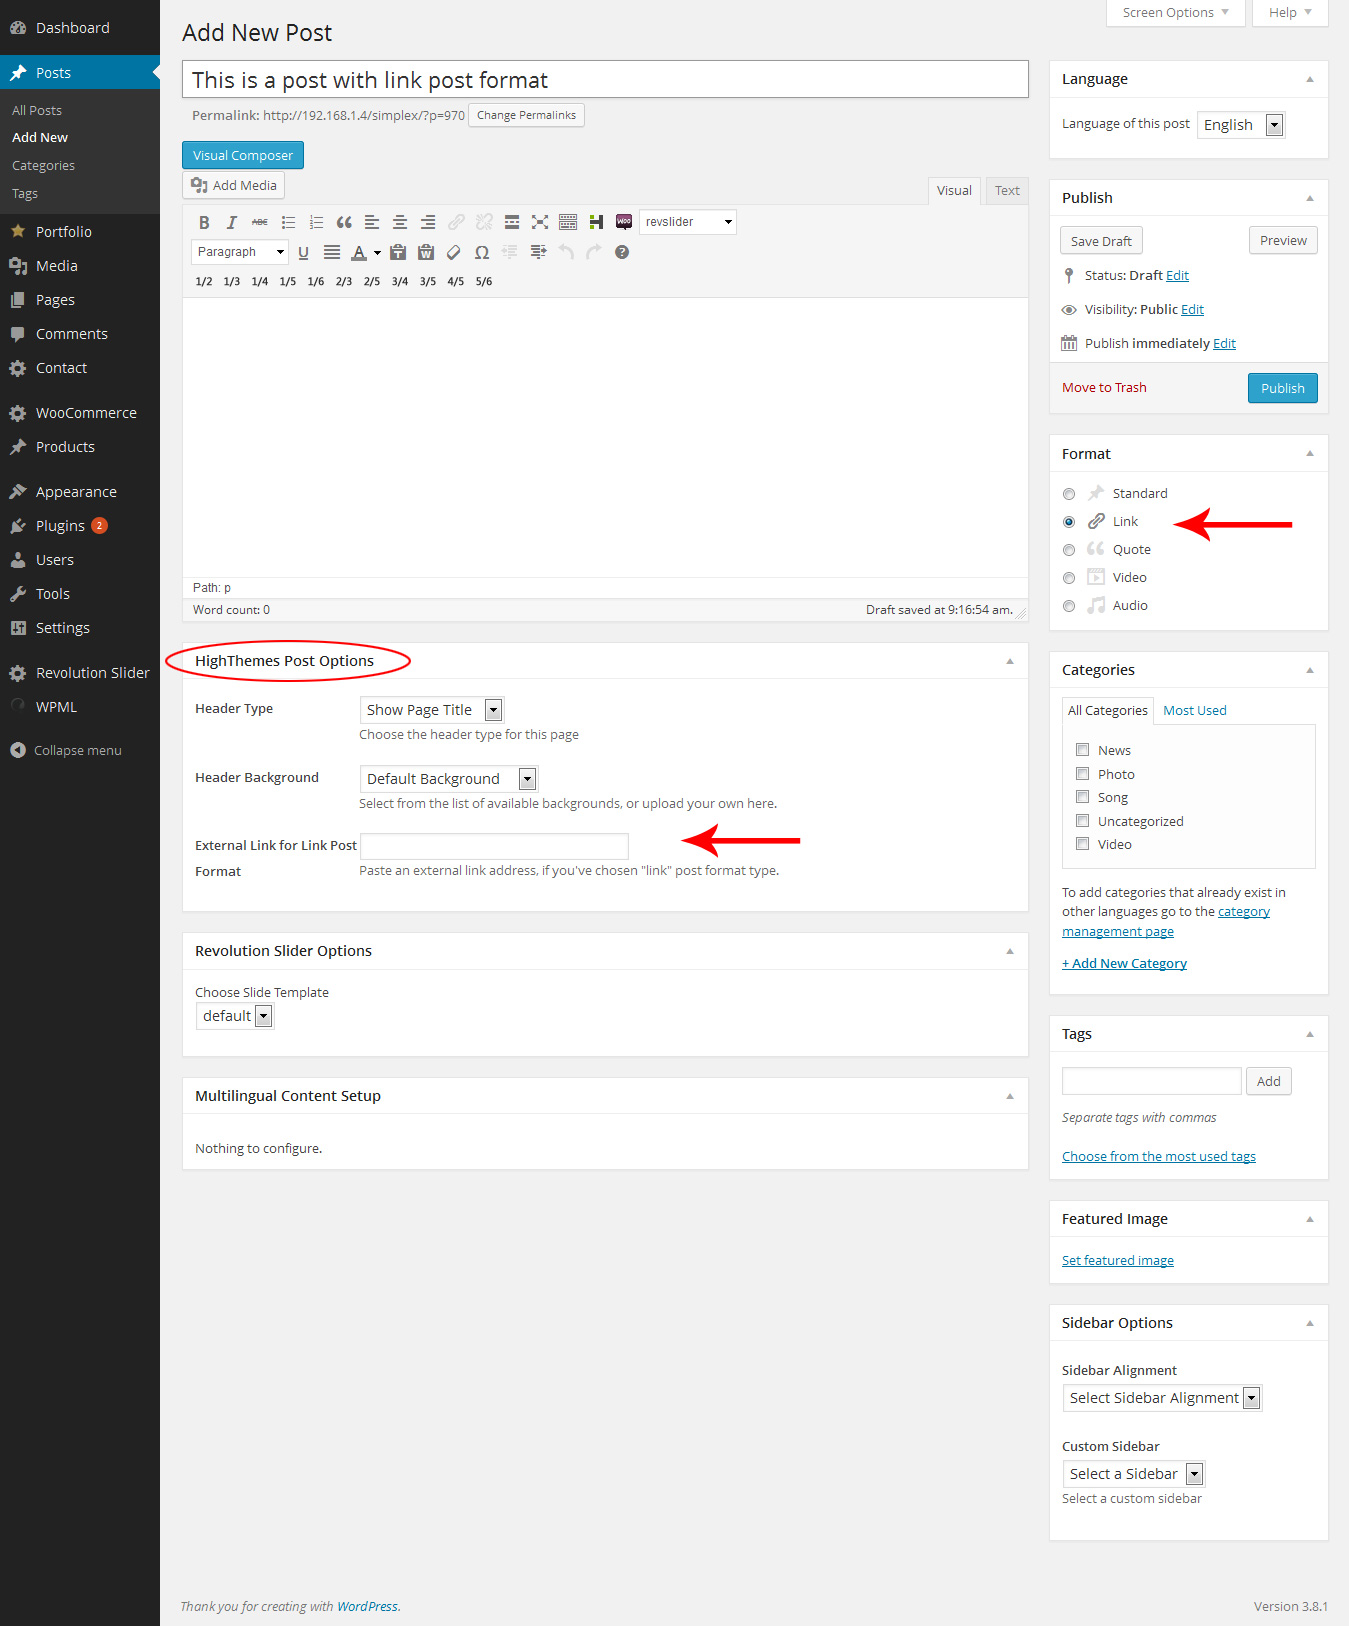
As we said above, every post format has its own special options that you can set them under HighThemes Page Options.
inCreate is one of the most customizable full-screen WordPress themes. You can almost change every style and make your own unique theme. There is a special section for that in admin options. Just go to WordPress admin dashboard and then go to Appearance -> Theme Options then go to Styling Options tab.
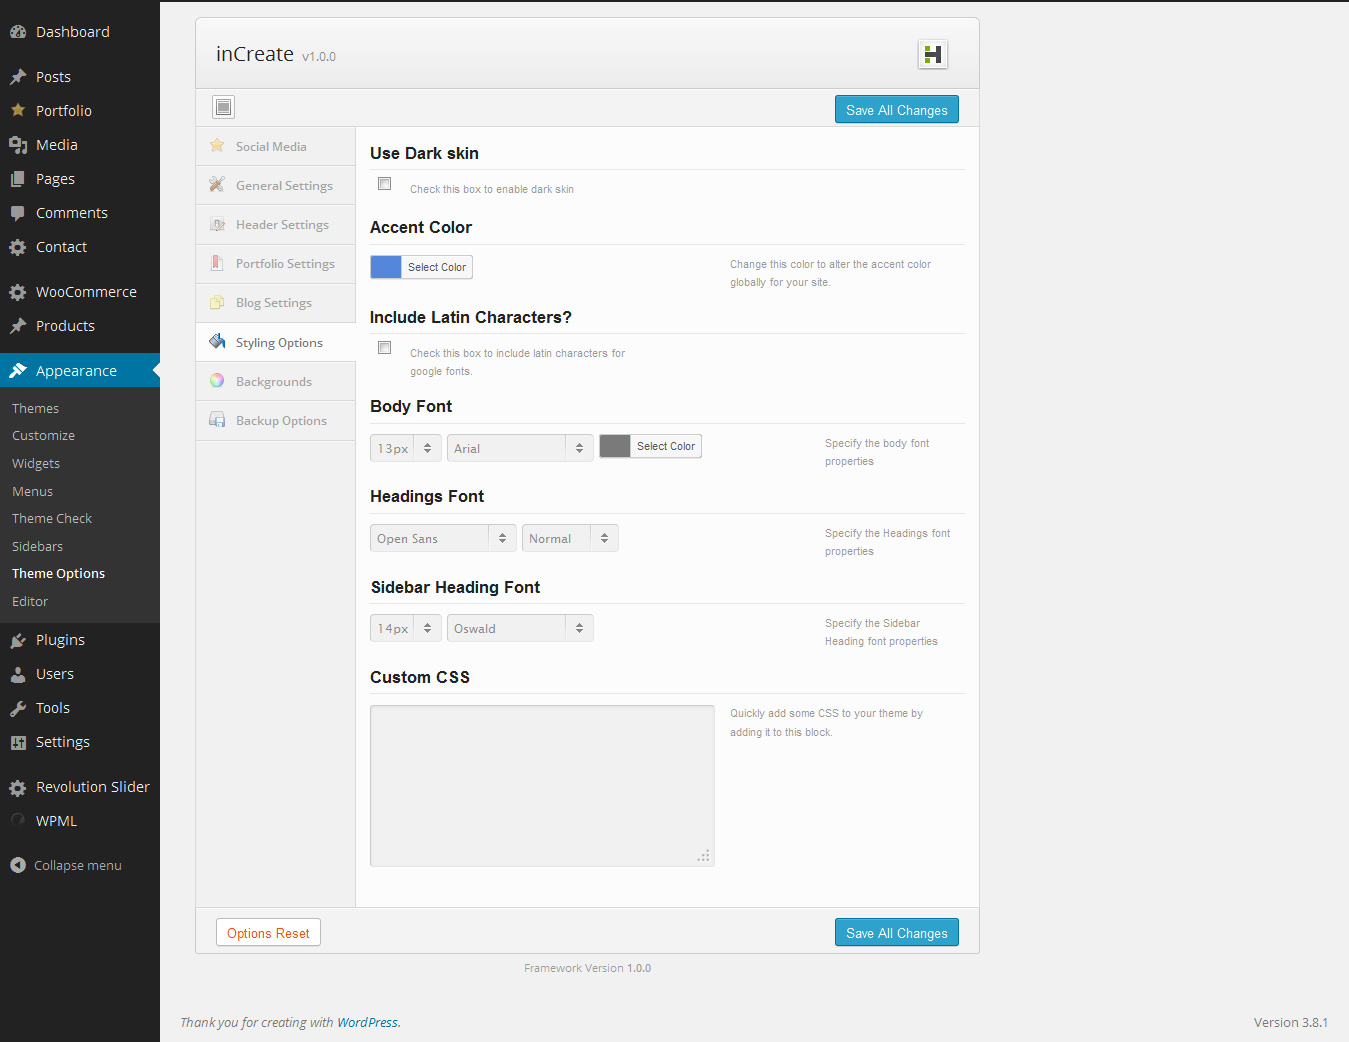
inCreate’s main CSS file is style.css which is located at the root folder of the theme (/wp-content/themes/inCreate/).
You can also find more CSS files in styles folder which is located in:
wp-content\themes\inCreate\styles
Our CSS file is organized like below:
*/ /* 0. CSS Reset /*-----------------------------------------------------------------------------------*/ /* 1. General Structure & Global Classes /*-----------------------------------------------------------------------------------*/
The theme comes with a lot of Javascript features. jQuery is the core library of all scripts. If you need to customize any of effects, go to /wp-content/themes/inCreate/scripts/ and open custom.js.